Authentication is an important aspect in any user interactive applications, which helps both in identifying who is interacting with the system at a given time and also securing the application from unrecognized access. While there are many approaches in designing a user authentication module, which describes how a user is identified and authenticated to use the application; token based authentication mechanism is one of the most advanced and secure ways of user authentication and securing APIs.
In this article, let’s look at how we can authenticate users and issue JWT tokens for those authenticated and secure app interactions in Angular. As a best practice, we achieve this in a decoupled architecture, where the Angular application securely redirects users to a SecureTokenServer (STS) which is responsible for the authentication logic and once successful, it issues an IdToken that represents the authenticated user identity. Once obtained, we append this token in all the API calls which happen whenever the user interacts with the application.
For setting up a SecureTokenServer (STS) we use IdentityServer4, which is an opensource token server developed on ASP.NET Core.
Getting Started – The User Flow:
Back in our SocialApp which allows users to Post their statuses for the others to view, it is important that we restrict the user to login before entering the application itself.
The flow goes like this:
- User opens the application
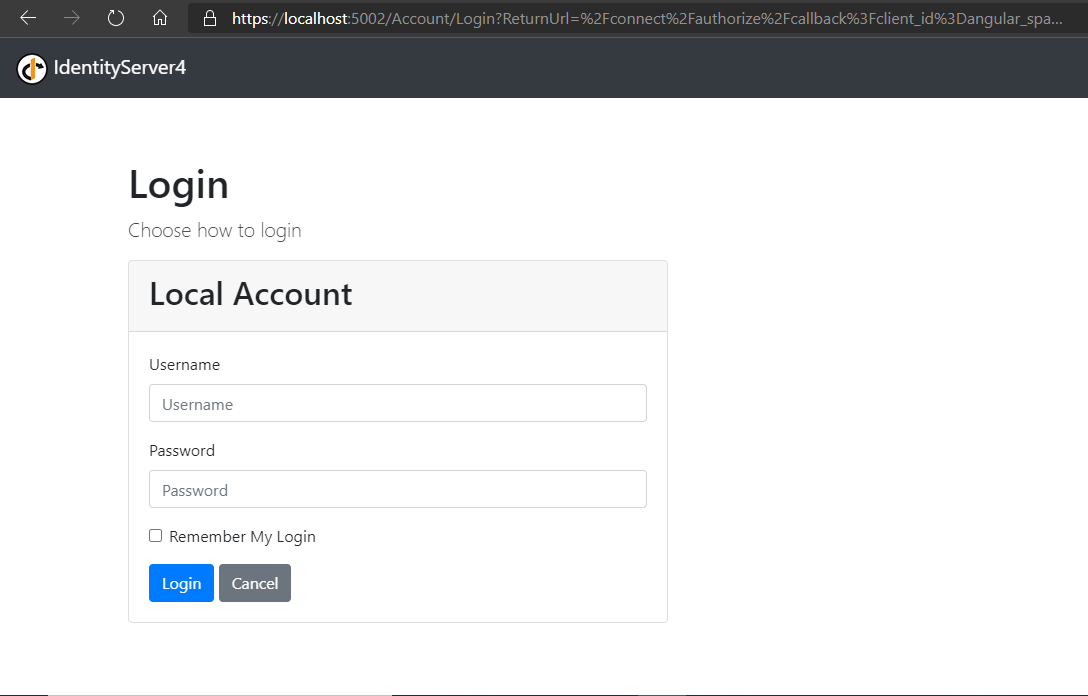
- application checks if the User has a logged in session, if not redirects user to the Login page which is hosted by the STS.
- User enters the login credentials in the STS login page, where validation occurs
- If valid, the STS issues tokens indicating the user session and places it inside the SessionStorage of the Angular application and redirects back to the application to some configured URL.
- At the configured redirectUrl, we decide where the user should be taken to; in our case Home is just enough.
- When the User tries to Post a new Status, the Angular app picks up the IdToken available in the SessionStorage and adds it to the Headers while POSTing the request to API
- At the API end, the incoming IdToken is verified of authenticity and if valid the request is accepted, otherwise returns a 401 (UnAuthorized) response.
To set this up, let’s begin by setting up the STS first. For starters, IdentityServer4 is yet another ASP.NET Core web application but comes with Token validation and generation logic built-in with the libraries. Learn more about Getting started with IdentityServer4 and its concepts here.
For our cause, we create a new Client for our application and we use an Implicit grant which should issue us IdToken when authenticated.
public static IEnumerable<Client> Clients =>
new Client[]
{
    new Client {
        ClientId = "angular_spa",
        ClientName = "Angular 4 Client",
        AllowedGrantTypes = GrantTypes.Implicit,
        AllowedScopes = new List<string> { "openid", "profile", "api1", "email" },
        RedirectUris = new List<string> { "http://localhost:4200/auth-callback" },
        PostLogoutRedirectUris = new List<string> { "http://localhost:4200/" },
        AllowedCorsOrigins = new List<string> { "http://localhost:4200" },
        AllowAccessTokensViaBrowser = true
    }
};
Observe that we’ve configured http://localhost:4200 as the domain for our Angular application, since this is where the application runs in our local system. When deployed, we shall change this to our hosted domain.
When we run our IdentityServer4 STS with this Client configured, the IdentityServer4 registers this as a Client and produces tokens based on the login request raised from the angular end with exactly the same parameters as those configured here.
Back to our angular application, we need to configure an oidc client which handles these login requests and tokens for us. To do this, we install the oidc_client package which is the official package provided by IdentityServer4 for JavaScript based applications.
> npm install --save oidc-client
Once installed, we shall encapsulate this Token logic inside a service which we shall inject in our components whenever needed.
Inside the OidcAuthService, we create a new instance of the UserManager, which is a library to handle the user session and tokens. We shall also have fields to maintain the User object when authenticated, and an Observer to publish user login status changes to subscribers via an Observable.
The initial setup somewhat looks like this:
@Injectable({
    providedIn: "root"
})
export class OidcAuthService {

    private config: UserManagerSettings = {
        authority: 'https://localhost:5002/',
        client_id: 'angular_spa',
        redirect_uri: 'http://localhost:4200/auth-callback',
        post_logout_redirect_uri: 'http://localhost:4200/',
        response_type: "id_token",
        scope: "openid profile email",
        filterProtocolClaims: true,
        loadUserInfo: true
    };

    private manager = new UserManager(this.config);
    private user: User = null;
    private userLoginSubject = new Subject<boolean>();

    constructor() {
        this.manager.getUser().then(user => {
            this.user = user;
        });
    }

    getUserLoggedInEvents(): Observable<boolean> {
        return this.userLoginSubject.asObservable();
    }

    ---
}
We shall now add methods which provide the signIn and signOut features into our application.
isLoggedIn(): boolean {
    return this.user != null && !this.user.expired;
}

signIn(): Promise<void> {
    return this.manager.signinRedirect();
}

completeSignIn(): Promise<void> {
    return this.manager.signinRedirectCallback().then(user => {
        this.user = user;
        this.userLoginSubject.next(this.isLoggedIn());
    });
}

signOut(): Promise<void> {
    return this.manager.signoutRedirect();
}

completeSignOut(): Promise<void> {
    return this.manager.signoutRedirectCallback().then(user => {
        this.user = null;
        this.userLoginSubject.next(this.isLoggedIn());
    });
}

isLoggedIn(): boolean {
    return this.user != null && !this.user.expired;
}
The signIn() method calls signinRedirect() on the UserManager, which creates an AuthRequest based on the Client settings we configured and redirects to the STS login.
On redirected back to the angular application to the component configured for the “/auth-callback” route which is AuthCallbackComponent, we call the completeSignIn() method which internally calls the signinRedirectCallback() method on the UserManager.
export class AuthCallbackComponent implements OnInit {

  constructor(private authService: OidcAuthService,
    private router: Router) { }

  ngOnInit(): void {
    this.authService.completeSignIn().then((value) => {
      this.router.navigate(["/"]);
    });
  }

}
This returns a Promise with the User object that is currently logged in. We set this incoming User object to the User field of the OidcAuthService and also publish the current login status provided by the isLoggedIn() method.
We shall use this service in the PostListComponent, where we’re also showing option to create new post.
export class PostListComponent implements OnInit, OnDestroy {

  posts: Post[];
  postsUpdatedSubs: Subscription;
  authSubs: Subscription;
  isLoggedIn: boolean;

  constructor(
        private postsService: PostsService,
        router: Router,
        private auth: OidcAuthService) { }

  ngOnDestroy(): void {
    this.postsUpdatedSubs.unsubscribe();
  }

  ngOnInit(): void {
    // get the current login status of the user
    this.isLoggedIn = this.auth.isLoggedIn();

    // get posts from API and
    // set to local posts model
    // which is binded in the view
    this.postsService.getPosts().subscribe(posts => this.posts);

    // Observable which notifies the component
    // whenever a new post is added to database
    let postsUpdatedSubs$ = this.postsService.getPostsUpdatedListener();
    this.postsUpdatedSubs = postsUpdatedSubs$.subscribe((posts) => {
      this.posts = [...posts];
    }, (error) => {
      // handle error
      console.log("Error in PostListComponent: " + error.message);
    });

    // subscribed to the user login status
    // when user logs in and session is set
    // the subscription returns the boolean flag
    let authSubs$ = this.auth.getUserLoggedInEvents();
    this.authSubs = authSubs$.subscribe((isLoggedIn) => {
      this.isLoggedIn = isLoggedIn;
    });
  }
}
Observe the isLoggedIn boolean flag which we shall use to show / hide the CreatePost widget.
<div *ngIf="isLoggedIn">
    <app-new-post></app-new-post>
</div>
<a *ngFor="let post of posts;" [routerLink]="['/posts', post?.id]">
    <div class="card my-2">
        <div class="card-body">
            <div class="container-fluid">
                <h5 class="card-heading">@{{post?.postedBy}}</h5>
                <p class="card-text">{{post?.text}}</p>
            </div>
        </div>
    </div>
</a>
Protecting Routes with AuthGuard:
AuthGuard is special service which protects any route from unwanted access. This allows the application to navigate to a particular route only when a given condition is satisfied, otherwise the entry is denied and an alternative happens.
In our application, we don’t want unauthenticated users to access our application. To implement this, we add an AuthGuard that checks whether the current user is authenticated and if not initiates a login request.
Since we want to use our OidcAuthService inside the AuthGuard, we decorate the AuthGuard as well as a service by using the @Injectable() decorator.
@Injectable()
export class AuthGuard implements CanActivate {

    private isLoggedIn: boolean;
    private observer$: Observable<boolean>;

    constructor(private authService: OidcAuthService) {
        this.isLoggedIn = this.authService.isLoggedIn();
        this.observer$ = this.authService.getUserLoggedInEvents();
        this.observer$.subscribe((flag) => {
            this.isLoggedIn = flag;
        });
    }

    canActivate(): boolean {
        if (this.isLoggedIn) {
            return true;
        }
        else {
            this.authService.signIn();
            return false;
        }
    }
}
Observe that we’re injecting the OidcAuthService service and also are subscribed to the login state changes via the Observable.
The canActivate() method is triggered when a configured route is hit and internally we check if the login session is active, otherwise we trigger signIn() method on the OidcAuthService which redirects user to STS login page.
This AuthGuard is configured to the empty route as well as the “/posts” route.
const routes: Routes = [
    {
        path: "posts",
        component: PostListComponent,
        canActivate: [AuthGuard] },
    {
        path: "posts/:id",
        component: PostItemComponent },
    {
        path: "",
        component: PostListComponent,
        canActivate: [AuthGuard] }
]
Attaching Token to API call – HttpInterceptor:
So far we’re able to authenticate users for accessing the application and persisting the user token within the OidcAuthService injectable. we’ve also added subscriptions enabling other components to be notified of the login state changes and also have added an AuthGuard that restricts access to components when the user is not authenticated.
Finally, let’s look at how we can use the token thus added to the storage when the user is authenticated and pass this to our Create Post API which allows only an authenticated user to POST data into database.
Firstly, let’s configure our API to add an authentication middleware which looks for a token and authorizes the request only if the token is valid. Note that I’m using an ASP.NET Core WebAPI for this application and so I’d do the configuration according to prerequisites in ASP.NET Core for Token Authentication.
public void ConfigureServices(IServiceCollection services)
{
    services.AddAuthentication(JwtBearerDefaults.AuthenticationScheme)
    .AddJwtBearer(options =>
    {
        options.Authority = "https://localhost:5002/";
        options.TokenValidationParameters
            = new TokenValidationParameters {
            ValidateAudience = false
        };
    });
}
Observe that we’ve added the Authority param, which points to the domain where our STS is running. As a requirement for IdentityServer4, we disable the ValidateAudience in our token params. This now validates the incoming token based on the configuration specified in the STS and the token lifetime and allows the request.
Next, we decorate our CreatePost endpoint with “Authorize” so that this middleware is triggered whenever a request is made to this API endpoint.
[Authorize]
[HttpPost]
public Post Post([FromBody] NewPostRequest post)
{
    -- some logic --
    return _repo.Add(post);
}
Now that the API side changes are done, let’s focus on the Angular end. Here the process is very simple – we just modify our HttpInterceptor which is triggered for every HTTP request and add the IdToken available in the Storage to the headers as an Authorization Header.
@Injectable({
    providedIn: "root"
})
export class PostsInterceptor implements HttpInterceptor {

    constructor(private oidcAuthService: OidcAuthService) {
    }

    intercept(req: HttpRequest<any>, next: HttpHandler)
        : Observable<HttpEvent<any>> {
        var requestPath = req.url;
        if (requestPath.indexOf('posts') > -1) {
            let auth_header = "";
            if (this.oidcAuthService.isLoggedIn()) {
                auth_header
                    = this.oidcAuthService.getAuthorizationHeaderValue();
            }
            req = req.clone({
                setHeaders: {
                    "Authorization": auth_header
                }
            });
        }

        // passes on the request to next handler
        // once all the handlers are executed
        // the request is now pushed into the network
        // for handling by the API
        return next.handle(req);
    }
}
Observe that we’re calling getAuthorizationHeaderValue() method from OidcAuthService which we haven’t added yet. The method just picks up the id_token property available from the User object and returns it.
getAuthorizationHeaderValue(): string {
    return `Bearer ${this.user.id_token}`;
}
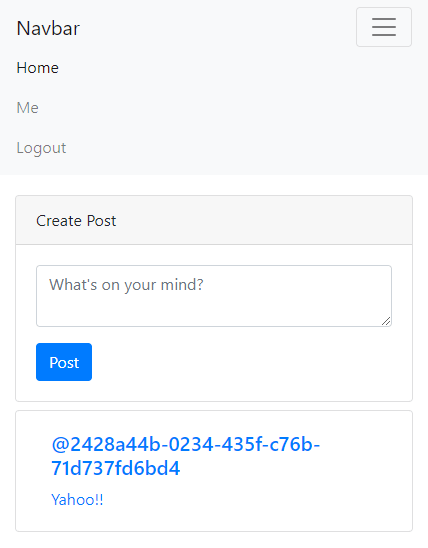
Once we run this application again and try making a CreatePost, we can see that our Token is now added to the headers.
curl 'https://localhost:5001/api/posts'
  -H 'authority: localhost:5001'
  -H 'accept: application/json, text/plain, */*'
  -H 'authorization: Bearer ##TOKEN##'
  -H 'x-request-id: 7df155c6-3191-7302-be03-3fe39e9202f7'
  -H 'content-type: application/json'
  -H 'origin: http://localhost:4200'
  -H 'sec-fetch-site: cross-site'
  -H 'sec-fetch-mode: cors'
  -H 'sec-fetch-dest: empty'
  -H 'referer: http://localhost:4200/'
  -H 'accept-language: en-US,en;q=0.9'
  --data-binary
When this request reaches the API, as mentioned above all the authorization happens and the API knows which user is trying to access the API through this token we passed.
Finally, when the User wants to sign out of the application, user clicks on the signOut() method on the OidcAuthService which triggers the signoutRedirect() method on the user manager, which redirects to the STS where the User Session is deleted and is redirected back to the application, to the post_logout_redirect_uri configured in the settings.
All this happens lively on the NavbarComponent representing the application navbar, where we place these links.
export class NavbarComponent
    implements OnInit, OnDestroy {

  isLoggedInUser: boolean;
  authSubs: Subscription;

  constructor(
    private auth: OidcAuthService,
    private router: Router) { }

  ngOnDestroy(): void {
    this.authSubs.unsubscribe();
  }

  ngOnInit(): void {
    this.isLoggedInUser = this.auth.isLoggedIn();
    this.authSubs = this.auth.getUserLoggedInEvents()
        .subscribe((loggedInStatus: boolean) => {
      this.isLoggedInUser = loggedInStatus;
    });
  }

  logout() {
    this.auth.signOut();
  }

  login() {
    this.auth.signIn();
  }
}
In this way, we can implement a typical User Authentication in Angular with the help of IdentityServer4 backed STS and ASP.NET Core API which does the API role.
{"text":"Yahoou0021u0021","type":0,"assetUrl":null,"postedBy":"2428a44b-0234-435f-c76b-71d737fd6bd4"}' --compressed When this request reaches the API, as mentioned above all the authorization happens and the API knows which user is trying to access the API through this token we passed.
Finally, when the User wants to sign out of the application, user clicks on the signOut() method on the OidcAuthService which triggers the signoutRedirect() method on the user manager, which redirects to the STS where the User Session is deleted and is redirected back to the application, to the post_logout_redirect_uri configured in the settings.
All this happens lively on the NavbarComponent representing the application navbar, where we place these links.
In this way, we can implement a typical User Authentication in Angular with the help of IdentityServer4 backed STS and ASP.NET Core API which does the API role.

Found this article helpful? Please consider supporting!