Imagine we have a producer server that relays some information that needs to be pushed on to the database.
This information is so random and so high-volume that if we are to write the data to the database as it is received, the chances of causing a memory leak or a performance hit are high.
So instead of consuming the data as it is received on the API end, we’d introduce a queue in the middle.
Why do we need a Message Queue?
The producer server puts all the records into this queue, which signals the subscribed Receiver Service inside our API that a new record has been received.
This serializes the entire process and helps the receiver reduce its load. The records are now process in a FCFS (First Come First Served) / FIFO (First In First Out) fashion.
The Message Queue takes the role of a Postbox, where the Producer drops the records as it creates and the Queue also behaves like a Postman who delivers it to the intended (or subscribed) Receiver in a serialized fashion, one record at a time. It creates a temporary buffer where the data produced by one component resides for a while, before it gets consumed by the other component.
In a Microservice architecture, where multiple services work on different entities and need to notify any change in entity to other services – a Message Queue is an important component that plays this buffer. This is called an Event-based communication pattern.
There are many Message broker solutions in the market, RabbitMQ is a simple implementation which works well for smaller workloads and suits well for proof-of-concept applications. For cloud native applications we do have equivalent services such as Amazon SQS.
In this article, let’s look at how do we setup a RabbitMQ and utilize its message queuing capabilities for queueing data created by a remote producer server and consume it and store it to a database via an AspNetCore API.
About RabbitMQ
RabbitMQ is a message-broker that offers multiple messaging protocols and features that help components asynchronously pass data (in the form of messages) among one another. We’re going to use RabbitMQ to play the Postman and the Postbox here – our choice of a Message Queue.
Setting up Rabbit MQ
RabbitMQ can be installed as a standalone server on various environments (Linux/Windows/Cloud) or can be used a docker image (my personal favorite). I’m going by the Docker route which can be installed as below:
> docker run -it --rm --name mymq -p 5672:5672 -p 15672:15672 rabbitmq:3-management
RabbitMQ server runs on the port 5672 by default and we’re now running a docker image of the RabbitMQ server which also comes with a management UI. This management UI visualizes all the additional settings, the available queues and options on these queues for the developer.
If you’re not interested in the management stuff, you can simply install just the RabbitMQ server as below:
> docker run -rm --name mymq -p 5672:5672 rabbitmq
Integrating RabbitMQ with ASP.NET Core
Step 1 – Setting up a producer service that writes to a queue
To demonstrate how RabbitMQ works, let’s create a Producer service that creates and puts new Heroes into the MQ, which is consumed by a Receiver service in our AspNetCore API.
Let’s say the Producer service is a .NET Core (.NET 5) console application, that constantly places data into the queue. In real-world, it can be any microservice that places some event data to be consumed by other services.
To connect and write to RabbitMQ, install the RabbitMQ.Client nuget package in the code to use the libraries to programmatically connect to and push content into the queue or to subscribe to and receive content from the queue.
> dotnet add package RabbitMQ.Client
Then in the Program.cs, we add the necessary logic for the integration.
4 Steps of Writing to a Queue
Writing to a Queue happens in 4 steps –
- Create Connection
- Create Channel
- Connect to (or Create) Queue
- Put data into the Queue
The code looks like below:
namespace RabbitMqSend
{
    class Program
    {
        public static void Main()
        {
            // specify the MQ server we're connecting to
            // in our case its localhost since we're running
            // in a local docker container
            var factory = new ConnectionFactory() { HostName = "localhost" };

            // 1. create connection
            using (var connection = factory.CreateConnection())

            // 2. create channel
            using (var channel = connection.CreateModel())
            {
                // 3. connect to the queue
                channel.QueueDeclare(queue: "heroes",
                                     durable: false,
                                     exclusive: false,
                                     autoDelete: false,
                                     arguments: null);

                int index = 1;
                while (index <= 99999)
                {
                    // we need to write data in the form of bytes
                    string message = $"{index}|SuperHero{10000+index}|Fly,Eat,Sleep,Manga|1|{DateTime.UtcNow.ToLongDateString()}|0|0";
                    var body = Encoding.UTF8.GetBytes(message);

                    // push content into the queue
                    channel.BasicPublish(exchange: "", routingKey: "heroes", basicProperties: null, body: body);
                    Console.WriteLine(" [x] Sent {0}", message); index++; Thread.Sleep(10000);
                }
            }
        }
    }
}
The code just creates a new record (with all its attributes seperated by a |) and pushes it into the queue at an interval of 10000ms. The setup just tries to mimic a general produces who produces some content frequently. In the real-world this would be a server that pushes data infinitely.
If we look at the code, we can observe the producer does the four steps mentioned before:
// 1. create connection
var connection = factory.CreateConnection()

// 2. create channel (that creates a channel with session and a model)
var channel = connection.CreateModel()

// 3. connect to the queue
channel.QueueDeclare(queue: "heroes", durable: false, exclusive: false, autoDelete: false, arguments: null);

// 4. put data into the queue
channel.BasicPublish(exchange: "", routingKey: "heroes", basicProperties: null, body: body);
Since we’re using these variables in a “using” block, the connections and channels are closed once the job is over. But a receiver needs to persist on the channel for receiving the data.
Step 2 – Setting up a consumer service that reads from a queue
We’d now create a receiver who’d continuously listen on this queue and get data as its placed. This receiver then inserts this received message into the database which is exposed for clients by the Web API.
But how do we run this receiver that is expected to run all the time? The answer is – wrap this functionality inside a Background Service.
The receiver service is a class that derives the BackgroundService class and overrides the ExecuteAsync() method. The implementation is as below:
namespace RabbitHeroesApi
{
    public class HeroReceiverService : BackgroundService
    {
        private IServiceProvider _sp;
        private ConnectionFactory _factory;
        private IConnection _connection;
        private IModel _channel;

        // initialize the connection, channel and queue
        // inside the constructor to persist them
        // for until the service (or the application) runs
        public HeroReceiverService(IServiceProvider sp)
        {
            _sp = sp;

            _factory = new ConnectionFactory() { HostName = "localhost" };

            _connection = _factory.CreateConnection();

            _channel = _connection.CreateModel();

            _channel.QueueDeclare(
                queue: "heroes",
                durable: false,
                exclusive: false,
                autoDelete: false,
                arguments: null);
        }

        protected override Task ExecuteAsync(CancellationToken stoppingToken)
        {
            // when the service is stopping
            // dispose these references
            // to prevent leaks
            if (stoppingToken.IsCancellationRequested)
            {
                _channel.Dispose();
                _connection.Dispose();
                return Task.CompletedTask;
            }

            // create a consumer that listens on the channel (queue)
            var consumer = new EventingBasicConsumer(_channel);

            // handle the Received event on the consumer
            // this is triggered whenever a new message
            // is added to the queue by the producer
            consumer.Received += (model, ea) =>
            {
                // read the message bytes
                var body = ea.Body.ToArray();

                // convert back to the original string
                // {index}|SuperHero{10000+index}|Fly,Eat,Sleep,Manga|1|{DateTime.UtcNow.ToLongDateString()}|0|0
                // is received here
                var message = Encoding.UTF8.GetString(body);

                Console.WriteLine(" [x] Received {0}", message);


                Task.Run(() =>
                {
                    // split the incoming message
                    // into chunks which are inserted
                    // into respective columns of the Heroes table
                    var chunks = message.Split("|");

                    var hero = new Hero();
                    if(chunks.Length == 7)
                    {
                        hero.Name = chunks[1];
                        hero.Powers = chunks[2];
                        hero.HasCape = chunks[3] == "1";
                        hero.IsAlive = chunks[5] == "1";
                        hero.Category = Enum.Parse<Category>(chunks[6]);
                    }

                    // BackgroundService is a Singleton service
                    // IHeroesRepository is declared a Scoped service
                    // by definition a Scoped service can't be consumed inside a Singleton
                    // to solve this, we create a custom scope inside the Singleton and
                    // perform the insertion.
                    using (var scope = _sp.CreateScope())
                    {
                        var db = scope.ServiceProvider.GetRequiredService<IHeroesRepository>();
                        db.Create(hero);
                    }
                });
            };

            _channel.BasicConsume(queue: "heroes", autoAck: true, consumer: consumer);

            return Task.CompletedTask;
        }
    }
}
To keep the connection persistent, we pull the declarations out of using blocks and place them inside the constructor. The same four steps are followed similar to the Producer flow
In this case we create a “Consumer” that subscribes to the queue and on any message received, an event handler is registered where read the message out of the queue and process it. In our case we insert the received message into our database as a new Hero.
Finally, we register this service as a HostedService in our Startup class.
services.AddScoped<IDapperr, Dapperr>();
services.AddScoped<IHeroesRepository, DapperHeroesRepository>();
services.AddSingleton<ICacheService, CacheService>();

->-> services.AddHostedService<HeroReceiverService>();
Testing RabbitMQ queuing in Action
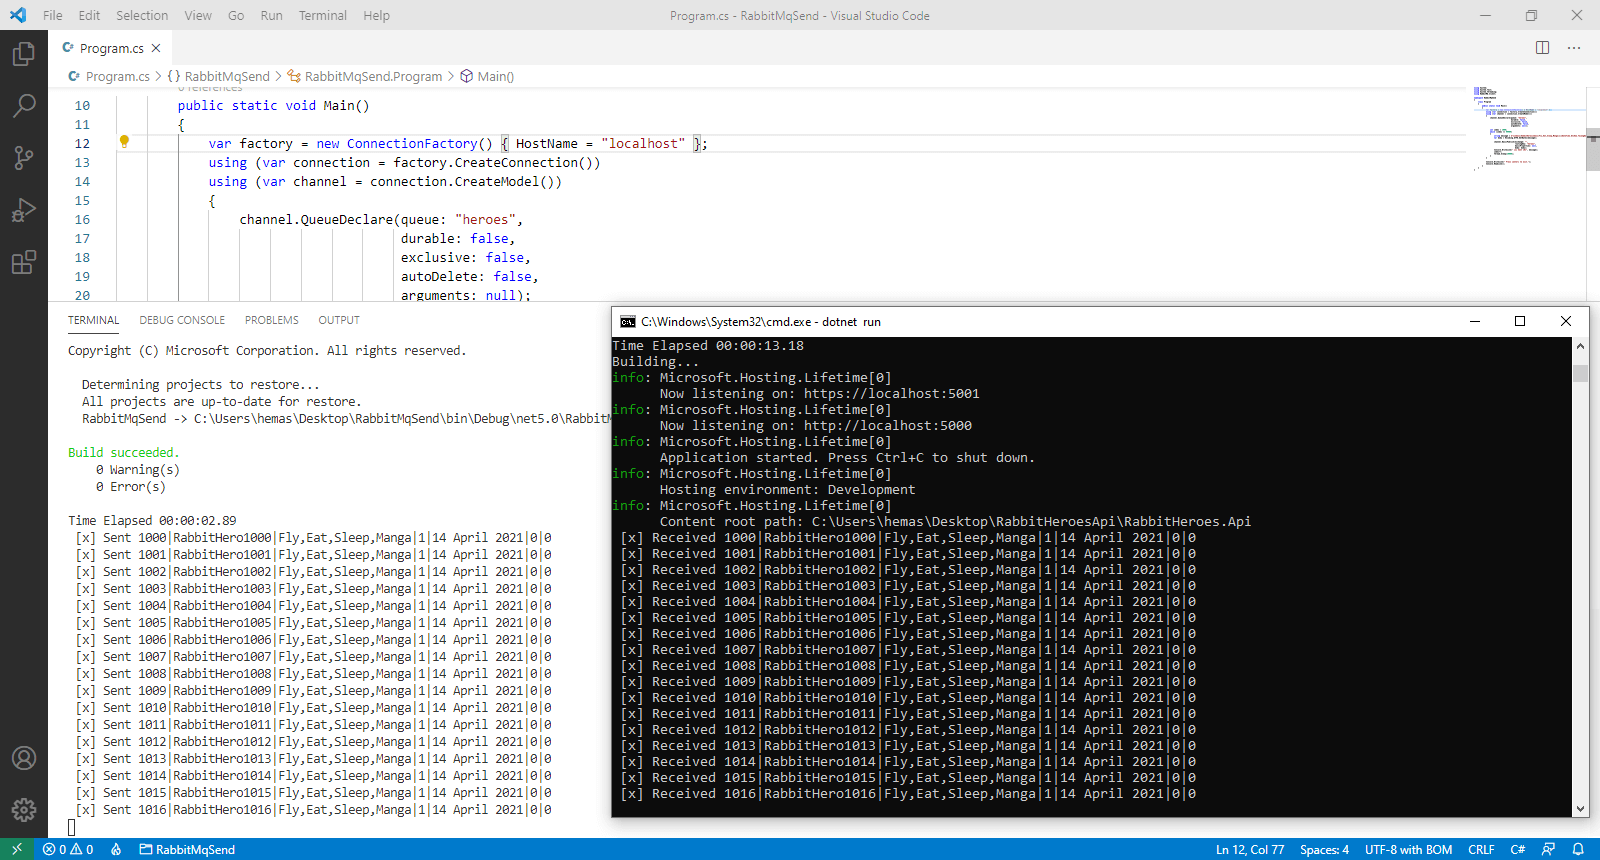
On running both the producer and the API simultaneously, we can see that the data created and written on to the queue is immediately consumed by the API via the Received event handler.

Found this article helpful? Please consider supporting!
Conclusion
The idea of Message Queues is important for microservice architecture deployed in the cloud, where each node processes different responsibilities and in the case where one request might require other services be notified of the changes, MQs play an important role of providing a temporary buffer for communication.
By leveraging messaging protocols such as AMQP (Avdanced Message Queueing Protocol) and a pub-sub model, RabbitMQ makes things easy for to create such a buffer to be shared and accessed by multiple service nodes and help notify each other of any required data.
Complete Example: https://github.com/referbruv/aspnetcore-rabbitmq-heroes-example
Found this article helpful? Please consider supporting!

Thanks for the code. For dispose I am using following method. I think your dispose statements not getting called.
public override async Task StopAsync(CancellationToken cancellationToken)
{
_channel.Dispose();
_connection.Dispose();
await base.StopAsync(cancellationToken);
}
Thanks for sharing!
Good job!
I have searched for this topic and found many ways working with RabbitMq consumer(listener) in ASP.NET Core. Before seeing this post, indeed, I have been got lost.
This post helped to me very well.
Thanks for author!