
Introduction
In order to learn how to work with Kafka, it’d be beneficial to see how we can set up a Kafka cluster locally in our machines, as it can be a cost effective way of getting familiar with the system. In this article, let us look at how we can set up and configure a simple Kafka cluster in our local environments, and the ways to do it. In my previous article I have explained in detail about the fundamental concepts of Kafka and the architecture.
You can check it out here – How to Get Started – Kafka Basic Concepts Explained
Setting up Kafka in your local machine
You can set up Kafka in your local system for playing around. You can do it in two ways –
- Download and install Apache Kafka binary specific to your environment (Windows, Linux or Mac)
- My preferred approach – run it via Docker
In both these approaches, you need to set up both Kafka and Zookeeper. While Kafka handles data that is being written and read by the clients, Zookeeper manages these Kafka nodes for scalability and resilience.
Kafka for data; Zookeeper for metadata about the servers.
Running Kafka using Binaries
You can download the latest available Apache Kafka and Apache Zookeeper binaries from Apache download sites.
You just need to unzip them into your local environment in a folder of your choice and then set up the environment variables. You need to make sure the Zookeeper knows the ports in which Kafka nodes are running and vice versa. Once you unzip the tar files of both Zookeeper and Kafka, first run Zookeeper server followed by Kafka.
In the Zookeeper binary folder, rename zoo_sample.cfg to zoo.cfg under cfg folder. Then navigate to \bin and within a command prompt (or terminal for Linux / Mac) run zhServer.cmd (or zhServer.sh for Linux).
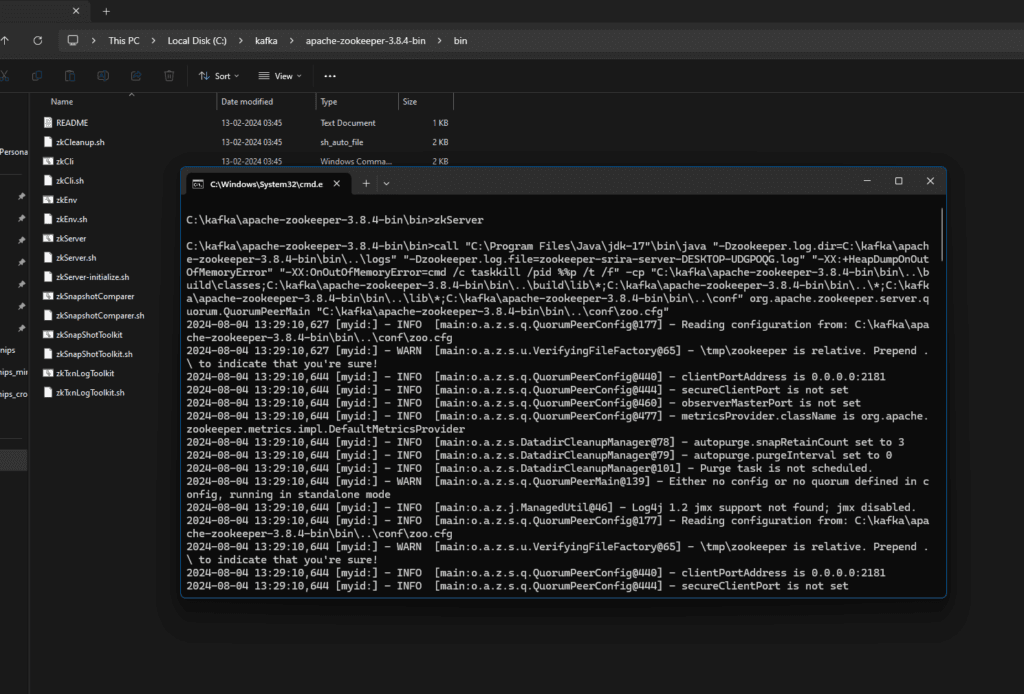
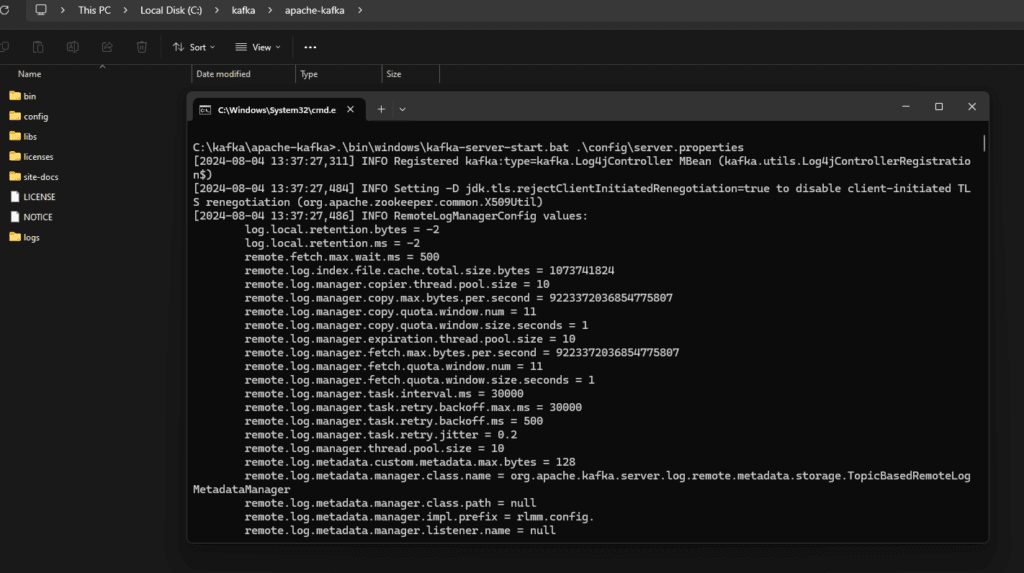
After Zookeeper is running, we can then start Kafka Server. To run Kafka Server, navigate to the Kafka binary folder and in the root directory within the folder where both bin and config folders are visible, run the below command in a Command Prompt –
> .\bin\windows\kafka-server-start.bat .\config\server.properties For Linux / Mac, you can use the following –
> .\bin\kafka-server-start.sh .\config\server.properties In case if you find the below error (as I encountered) –
The input line is too long. The syntax of the command is incorrect.You need to shorten your Kafka directory path, just rename it to some shorter length and close the command prompt window and run the same command in a new window, it should work for you.
This approach works just fine, but you need to ensure you have the prerequisites installed in your machine like Java Runtime and so on. Hence I generally don’t suggest going with this approach. We can use this setup to create and work with Topics, which I will explain in later sections.
Running Kafka using Docker (my personal choice)
In the Docker approach, you can set up and run both Kafka and Zookeeper using the official Docker images. This approach is my personal favorite and I use this for my own development. This is because you don’t need to worry about the required installations and prerequisites.
To install Kafka via Docker, you have so many options available – because Kafka is open-sourced, there are many providers for Kafka Docker Image, including Ubuntu, Apache Kafka, Confluent, Conductor and so on.
You can use the confluent Docker image of the Community Edition. It’s free to use; just that the enterprise features aren’t available here.
I’m using these Docker Images in my Kafka Docker setup –
- confluentinc/cp-kafka
- confluentinc/cp-zookeeper
You can combine to run both of them together with a simple Docker Compose file, since it ensures both are managed together without any networking issues.
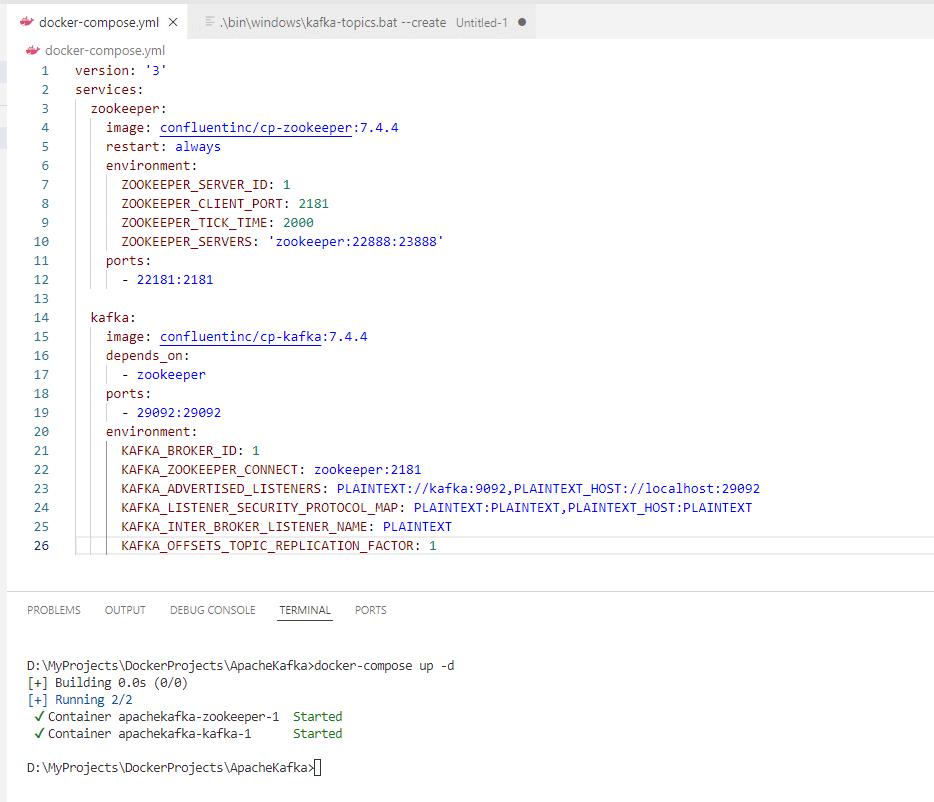
The docker-compose yml looks like below –
version: '3'
services:
  zookeeper:
    image: confluentinc/cp-zookeeper:7.4.4
    restart: always
    environment:
      ZOOKEEPER_SERVER_ID: 1
      ZOOKEEPER_CLIENT_PORT: 2181
      ZOOKEEPER_TICK_TIME: 2000
      ZOOKEEPER_SERVERS: 'zookeeper:22888:23888'
    ports:
      - 22181:2181

  kafka:
    image: confluentinc/cp-kafka:7.4.4
    depends_on:
      - zookeeper
    ports:
      - 29092:29092
    environment:
      KAFKA_BROKER_ID: 1
      KAFKA_ZOOKEEPER_CONNECT: zookeeper:2181
      KAFKA_ADVERTISED_LISTENERS: PLAINTEXT://kafka:9092,PLAINTEXT_HOST://localhost:29092
      KAFKA_LISTENER_SECURITY_PROTOCOL_MAP: PLAINTEXT:PLAINTEXT,PLAINTEXT_HOST:PLAINTEXT
      KAFKA_INTER_BROKER_LISTENER_NAME: PLAINTEXT
      KAFKA_OFFSETS_TOPIC_REPLICATION_FACTOR: 1
You can then run this script using the following command. you need to have a running Docker Desktop in your system for this to work.
> docker-compose up -d Once you hit this command, you will have both Zookeeper and Apache running within the Docker context.
Creating Topic and Testing using Command Line
Using commands on Binaries
We can test if our Kafka server works fine using the command line approach, by creating a simple Topic and then writing Producer Consumers to put data into it.
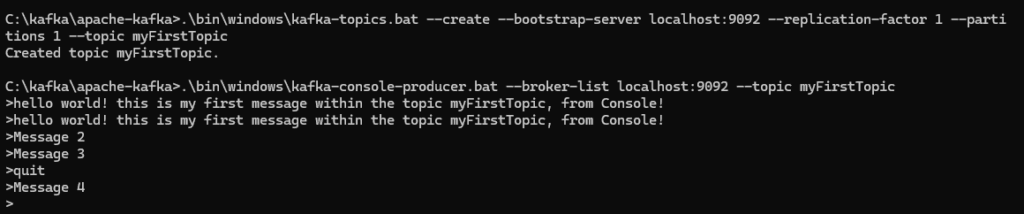
To create a new Topic, you can use the below command within the Kafka root directory –
> .\bin\windows\kafka-topics.bat --create --bootstrap-server localhost:9092 --replication-factor 1 --partitions 1 --topic myFirstTopic Here, we are providing the details of the Kafka server where it will be created, the replication factor, number of partitions this topic will have and the name of the Topic.
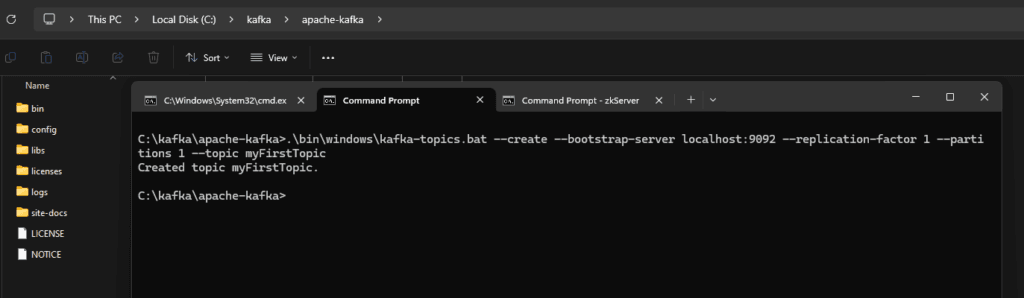
Once the Topic created, we get the following response
> Created topic myFirstTopic. We can quickly create a sample Producer and Consumer for this Topic and see how this works!
To create a sample Producer via Console, use the following command
> .\bin\windows\kafka-console-producer.bat --broker-list localhost:9092 --topic myFirstTopic In the subsequent prompts, you can type your messages to be sent to the topic for a consumer to read it.
On another window, use the following command to start a Consumer over the console and listen on the Topic for messages
> .\bin\windows\kafka-console-consumer.bat --bootstrap-server localhost:9092 --topic myFirstTopicIn previous versions of Kafka, we used to specify the Zookeeper details in the command, but its now deprecated and we use bootstrap-server argument instead.
As you hit this command, you will see any messages that have been published on the topic from that moment on.

Using Commands inside Docker
In the Docker setup, you need to execute these commands within the Docker container, because it is where Kafka Server runs. To create Topic and test with sample Producer / Consumer similar to binary setup, you can use the following commands.
To create a new Topic, you can use the below command
> docker exec -it apachekafka-kafka-1 kafka-topics --create --bootstrap-server localhost:9092 --replication-factor 1 --partitions 1 --topic myFirstTopic This will create a new Topic, which you can connect and work with.
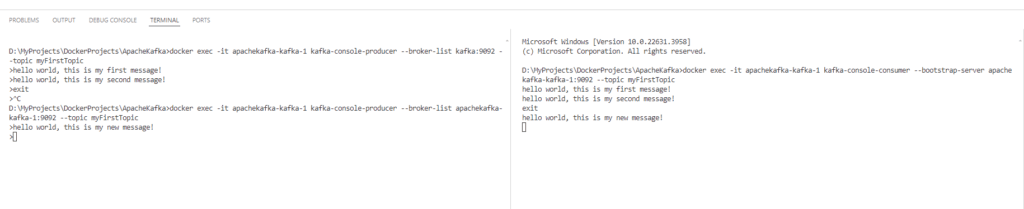
To create a simple Producer within the Console, use the following command
> docker exec -it apachekafka-kafka-1 kafka-console-producer --broker-list localhost:9092 --topic myFirstTopic On the subsequent prompt, you can type your messages and they will be put into the Topic. To read from this Topic using a Console Consumer use the following command
> docker exec -it apachekafka-kafka-1 kafka-console-consumer --bootstrap-server localhost:9092 --topic myFirstTopic UI Tools for Managing Kafka
The community editions of Kafka don’t come with a GUI with itself, the one that confluent offers is a part of its enterprise edition, which isn’t free.
However, there are alternatives using which we can configure and manage Topics on a running Kafka cluster. You can give Offset Explorer a try, which is a free GUI tool for managing Kafka. You can simply download from here https://kafkatool.com/download.html, and after installation just need to provide the port where Kafka is running.
You can use this tool to create Topics and manage them. It can also connect to the Zookeeper to see the list of consumers and provide information about them. There are other tools as well worth checking out – such as UI for Apache Kafka (https://github.com/provectus/kafka-ui), KafkaEsque (https://github.com/patschuh/KafkaEsque), and so on.

Conclusion
In this article, we have looked into the various ways in which we can set up Kafka in our development machines. While the binary approach is straightforward, I personally like the Docker approach, because it is easy to set up and get things running.
You can use the Kafka CLI commands to create and manage Topics, while it also provides a simple Console tool for creating Producer and Consumer for it.
Offset Explorer is one simple tool that can compensate for the lack of usable GUI for Community editions of Kafka. There are also other tools as well which we have looked into.

