Introduction
This is the fourth article in the “Flutter for Beginners” series. So far we have seen what flutter is about and how to get started in the world of flutter.
We have also seen the things to be done to setup the flutter development environment and the flutter command line using which we can created a new application project which comes by default with a demonstrating application.
We have also looked at the various folders and files that are organized in the sample project and inspected each one for their purpose.
Finally we have checked out the code within the main.dart file which is the starting point for the app execution and had our first app run.
In this article, we shall look at basically what widgets are and observe the two main categories of widgets on which the entire flutter development mainly runs on.
Read How to setup Flutter Development Environment Here – How to Install and Configure Flutter
Know how a Flutter Project looks like Here – Understanding App Structure and Anatomy
Know What is the purpose of main.dart file Here – main.dart and First run
What is a Widget?
Let’s revisit the term “Widget” we have looked at sometime back in a previous article. A Widget can be termed as an individual component or a block of view that is presented either visibly or invisibly (let’s look at these things as we dive in further) on the app screen.
In Flutter everything we see or build to be presented on the view is a Widget. Even the entire app we run is somewhat considered as a “Widget” by the flutter runtime. This enables us to create reusable components which are faster to load and can be asynchronous towards each other.
This can also benefit us in building an application in a modular manner rather than in a monolithic way and also helps towards fast reloading (or the hot reloading as it is termed by flutter) where in only that “Widget” part shall be reloaded over a code change instead of the entire application reloading. This helps in faster development as well for us.
Now coming to the Visible and Invisible part; When we’re trying to build an application by means of modules wherein each block shall be placed on the other; we shall look forward to arranging the blocks in some manner so as to bring a good user experience on the app.
We arrange the blocks (or the widgets) horizontally, vertically in an order which looks best for the user to interact with the app. This we call it as a Layout; and in Flutter we create layouts of widget arrangement by means of widgets again!
And these Layout widgets lay the child widgets or the content widgets in a defined manner over the screen. Since these widgets only form the skeletal structure for a layout and they themselves can’t be seen – we call them invisible.
On the other hand there are the visible widgets such as a Text, Button or a Label which the user can see in some fashion laid out by these invisible widgets; we can call them as Visible widgets.
What are Stateless and Stafeful Widgets?
When we run our application, internally the flutter runtime calls the “Widget” that has been passed onto the runApp() method. This “Widget” is basically the entire thing that is shown on the screen. It uses the data that we pass to it to be presented (or not be passed in cases like labels), and Once the Widget has been rendered on the screen the Widget remains “immutable”.
Meaning there’s nothing to change on the Widget or be persisted when the widget is reloaded on the screen. Each time the screen loads the widget, each time the widget is re-rendered with a new “state”, with no memory about its old state. This kind of behavior is what we call “Stateless” and these kind of Widgets are called “Stateless Widgets”. The other kind of Widgets which do keep memory of their previous “state” are called “Stateful Widgets”.
“Stateless Widgets have no memory of their previous existence while Stateful widgets keep track of their old state.”
A “State” is nothing but the data which has been presented or computed in a Widget’s lifetime. When we kill the application or do some operation which refreshes the screen, this piece of computed or presented “data” on the Widget can be ignored or kept track for future use. This behavior differentiates a Stateful Widget from a Stateless Widget.
Stateless Widgets are “Ephemeral”
Let’s take the example of a Button and a Counter, and the button shall increase the count of the counter whenever we tap on the button. Let’s write a small Widget code for this presentation.
import 'package:flutter/material.dart';

class CounterPage extends StatelessWidget {
  int counter = 0;
  @override
  Widget build(BuildContext context) {
    // TODO: implement build
    return Scaffold(
      appBar: AppBar(
        title: Text('My App'),
      ),
      body: Column(
        children: <Widget>[
          Text('The Counter is $counter'),
          RaisedButton(
            child: Text('Click'),
            onPressed: () {
              counter++;
              print(counter);
            },
          )
        ],
      ),
    );
  }
}
In this case, we have a Button with an onPressed event handler that is invoked each time the button is tapped. And there we increment the counter which is also being shown over the screen. Theoretically this should work, but when we actually tap the button nothing happens; the counter stays there without any change.
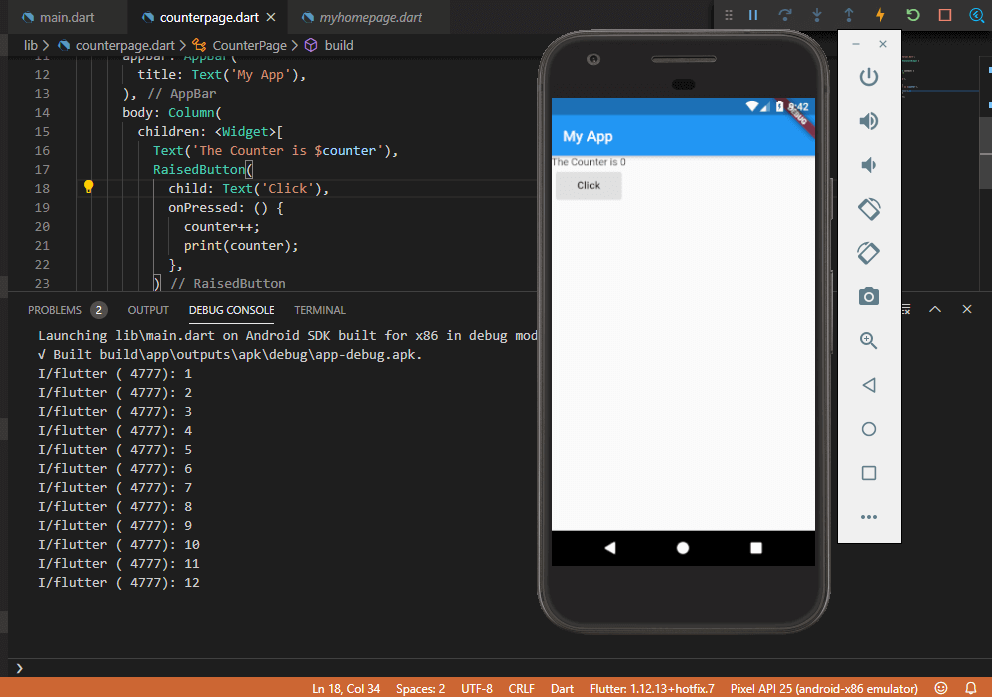
And we can see that the counter is actually incremented basing on the console output we print within the button click handler. Why? This is because, even though we tap the button which internally causes a variable to be changed; this is not reported onto the widget causing it to reload.
“A Stateless widget never reloads keeping its data persistent overall.”
The method responsible for a widget repaint is the build() method which is invoked when to present a widget over the app screen; but for a Stateless widget this seldom happens and when one happens; the entire widget along with the data variables it holds are reloaded with their default values causing the old values to be reset without any persistence. This is where the Stateful widget comes in handy: for widgets which need to hold a set of values over time.
Stateful Widgets can Persist data
A Stateful widget on the other hand keeps a track of a set of variables on change of which the widget is invoked to be repainted on the screen without having to reset those set of variables. This helps us to re-render some or the entire widget with the new changes that have been augmented on those variables. But creating a Stateful widget is a bit complex than building a Stateless widget.
“A Stateful widget is a sort of Stateless Widget with an extra piece of State tracking.”
A Stateful Widget is a widget class linked to a State class, and whenever the State changes; the Widget also changes. Let’s try changing our CounterPage class into a Stateful widget as below:
import 'package:flutter/material.dart';
class CounterPageStateful extends StatefulWidget {
@override
State<StatefulWidget> createState() {
// TODO: implement createState
return CounterPageState();
}
}
class CounterPageState extends State<CounterPageStateful> {
int counter = 0;
@override
Widget build(BuildContext context) {
// TODO: implement build
return Scaffold(
appBar: AppBar(
title: Text('My App'),
),
body: Column(
children: <Widget>[
Text('The Counter is $counter'),
RaisedButton(
child: Text('Click'),
onPressed: () {
setState(() {
counter++;
});
print(counter);
},
)
],
),
);
}
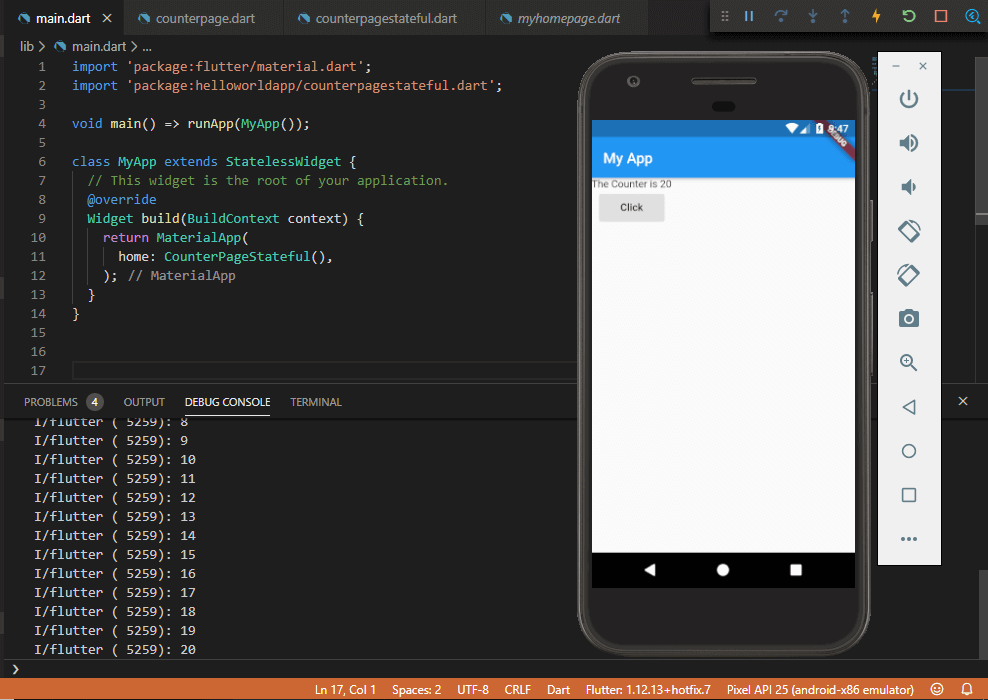
}We have the CounterPageStateful widget which extends a “Stateful” widget instead of the usual Stateless Widget. And then we have a separate CounterPageState class which extends a State class with a type of CounterPageStateful. And within the CounterPageStateful class we have the CounterPageState instance being returned in the createState() override method. What this means is that basically we create a two-way binding between the “Widget” and its “State”.
Whenever something in this “State” changes, the Widget is immediately invoked off the build() method that repaints the widget onto the screen. And since we need to maintain this “State” information out of the Widget so that the “State” information is not affected by the rebuild of the Widget; we have this State maintained outside of the Widget with an internal link.
Observe the counter variable within the onPressed event handler of the button; now it sits inside a method called setState(). This method acts as a sort of region wherein the variables are modified and are persisted over the repaint.
Whenever something in this setState() changes, the build() is invoked keeping hold of the changed values. Let’s run this code now and look at our counter in action.
In this way, we can make use of Stateless and Stateful widgets depending on the kind of widgets we are trying to develop.
When to use Stateful and Stateless Widgets
- Stateless widgets are best suited for static representations where the change in data doesn’t happen or is not required.
- Best examples are Static text or labels.
- Stateful widgets are best suited for scenarios wherein we handle dynamic data which changes over time and the entire widget is not needed to be repainted for these changes.
- Best examples are animations and dynamic validation forms.

