A SecureTokenServer (STS) is a service that issues tokens to clients. These tokens can be used to access an API or represent an authenticated user Identity against a userstore. using a SecureTokenServer (STS) delegates the responsibility of session management or user authentication against a variety of Identity Providers.
It also eases applications so that they can have better focus on their responsibilities while a centralized STS handles the user management for them. It is also known with other popular terms such as Authorization Server, Identity Provider and so on.
An STS can also provide a Single Sign-on (SSO) experience to the users, so that with a single signin credentials they can access the secured application on any platform such as Web, Mobile or Tablet and the applications can contact the centralized STS for handling sessions across all these platforms.
A few popular examples of such STS implementations in the market include the ones provided by Google, Facebook, Azure AD, AWS Cognito, Okta, Oracle SSO to name a few.
What is IdentityServer4?
IdentityServer4 is a popular library for developing a SecureTokenServer for user applications. It runs on the internet standards of OAuth2 and OpenId Connect and issues Tokens to clients for access to authenticated user identities or APIs that are registered under it. There are several iterations of IdentityServer and the latest one is IdentityServer4 that is built on .NET Standard and supports developing a TokenServer in Dotnet Core.
IdentityServer is a free, open source OpenID Connect and OAuth 2.0 framework for ASP.NET Core which helps to integrate token-based authentication, single-sign-on and API access control in applications.
Fundamentals and Terminology
Since IdentityServer4 works on OAuth2 and OpenId standards, it supports Authentication Flows of clients according to the OAuth standards. There are three fundamental terms used in IdentityServer which are most important to keep in mind while developing a TokenServer or adding support for a new application or API in it. They are:
- Clients
- ApiResources
- IdentityResources
Clients – the party which requests the TokenServer for issuing Token to it for access. The access can be either to authenticate a user identity or to access an API. This results in two types of tokens issued:
- id_token => one which represents an authenticated user identity containing his details. An id_token in its bare minimum contains a unique identifier that represents the authenticated user in the user store which is called as the “subject id” or “sub” claim in the token.
- access_token => a piece of string which indicates that the client is allowed to access the API it is issued for.
In order to request token, a client must be registered in the TokenServer. For any application, the web, mobile, or desktop platform versions can form different clients in the TokenServer and must user their respective client configurations to request for tokens. A Client possesses two properties – clientId and clientSecret, which uniquely identify a client in the TokenServer and which must be supplied while requesting tokens.
ApiResources – An API resource represents an API functionality registered in the TokenServer and which only allows those requests which possess tokens issued by the TokenServer. An Api Resource generally requires an access_token to be passed in the request header for access to the API.
IdentityResources – An Identity Resource represents a piece of information about the authenticated user. A client generally requests access to specific pieces of information from the identity of an authenticated user by specifying a few predefined Identity Resources, which also defined in the OpenId standards. They are OpenId, Profile, Email etc. The TokenServer issues an id_token which contains the information requested by the client.
The Authentication Flows –
OAuth standard defines a few particular ways in which a TokenServer can be requested for specific tokens representing access or identity. These ways are called as Authentication Flows.
There are popular Authentication Flows defined in the OAuth in which a client can obtain a token from the TokenServer such as:
- AuthorizationCode Flow – where the client exchanges an AuthorizationCode along with its clientId and clientSecret obtained by authenticating a user against the TokenServer for token.
- Implict Flow – where the client is directly issued an accessToken without having to pass an AuthorizationCode by the TokenServer. This is a kind of simplified AuthenticationCode flow which is not recommended for use these days.
- Client_Credentials Flow – where the client POSTs its clientId and clientSecret to the TokenServer in exchange for an access_token to access an API. This is mostly used by console applications and APIs which don’t require a user interaction in their responsibilities.
- ResourceOwnerPassword or Password Flow: where the client POSTs the actual username and password of the resource owner directly to the Token server to exchange for an access_token. This flow is also used in scenarios where no manual interaction takes place and generally in the cases of Machine-to-Machine or Component-to-Component interactions which can be fully trusted.
Configuring a TokenServer using IdentityServer4 –
To implement a SecureTokenServer (STS) in DotnetCore with IdentityServer4, we have to choices:
- Using an IdentityServer4 Template which comes with Boilerplate code to make things easy.
- Building things from the scratch
In either way, its easy to install and configure IdentityServer4 in an AspNetCore application which turns it into a SecureTokenServer with auto generated endpoints to authorize, fetch tokens and even get user information based on the token. We’ll try to build our TokenServer from the bare minimum, so that we can learn about each thing as we go forward.
To get started, let’s create an empty AspNetCore application with Web Template:
> dotnet new web --name Ids4.SimpleStsNext, install IdentityServer4 on the application we just created. Please ensure that the stable version “3.1.0” is passed as the version attribute, otherwise you might run into issues with the latest version “4.0.0”
> dotnet add package IdentityServer4 --version 3.1.0We now need to define our Clients, ApiResources and IdentityResources which we want to configure in our TokenServer to work with. In a new class named Config, define three properties that define Clients, ApiResources and IdentityResources as below:
public static class Config
{
    public static IEnumerable<IdentityResource> Ids =>
        new IdentityResource[]
        {
            new IdentityResources.OpenId(),
            new IdentityResources.Profile()
        };

    public static IEnumerable<ApiResource> Apis =>
        new List<ApiResource>
        {
            new ApiResource("api1", "My API")
        };

    public static IEnumerable<Client> Clients =>
        new List<Client>
        {
            new Client {
                ClientId = "ropg_client",
                AllowedGrantTypes = GrantTypes.ResourceOwnerPassword,
                ClientSecrets = {
                    new Secret("secret".Sha256())
                },
                AllowedScopes = { "api1", StandardScopes.OpenId }
            },
            new Client
            {
                ClientId = "simple_client",

                // no interactive user
                // use the clientid/secret for authentication
                AllowedGrantTypes = GrantTypes.ClientCredentials,

                // secret for authentication
                ClientSecrets =
                {
                    new Secret("secret".Sha256())
                },

                // scopes that client has access to
                AllowedScopes = { "api1" }
            }
        };
}
In the above code, we have configured an ApiResource which is identified by “api1” representing an API functionality to be secured by the TokenServer. Two IdentityResources OpenId and Profile which represent the identity properties to be returned when a user requests for id_token.
Observe that we already have two clients defined here which are configured two use different authentication flows, specified by their GrantTypes: ClientCredentials and ResourceOwnerPassword (ROPG).
We shall talk in detail about these along with other authentication flows we mentioned earlier as we move forward.
In the Startup class we add the IdentityServer4 service and middleware to the pipeline with the Client, Api and IdentityResources used from the Config class.
public void ConfigureServices(IServiceCollection services)
{
    var builder = services.AddIdentityServer()
        .AddInMemoryApiResources(Config.Apis)
        .AddInMemoryClients(Config.Clients)
        .AddInMemoryIdentityResources(Config.Ids);

    builder.AddDeveloperSigningCredential();
}

public void Configure(IApplicationBuilder app)
{
    app.UseIdentityServer();
}
We pass the Apis,Ids and Clients from the Config class through the AddInMemoryApiX() extension methods, which specify that the IdentityServer must read values from these static values predefined inside the code.
In a real-world scenario, we make use of an external store such as a database for the IdentityServer to read and configure dynamically so that if some value changes we don’t need to restart the server.
Also its mandatory for a TokenServer to run in a secure environment with SSL configured (so as to make it actually “secure”). Since we’re running on a development mode, we make use of the developer certificate of the DotnetCore to configure the TokenServer.
Now that we have configured everything, let’s verify by running the server and invoking a specific “endpoint”
> dotnet runThe url is called as the Discovery Endpoint that gives us information about all the endpoints which handle specific functionalities in the TokenServer.
https://localhost:5001/.well-known/openid-configuration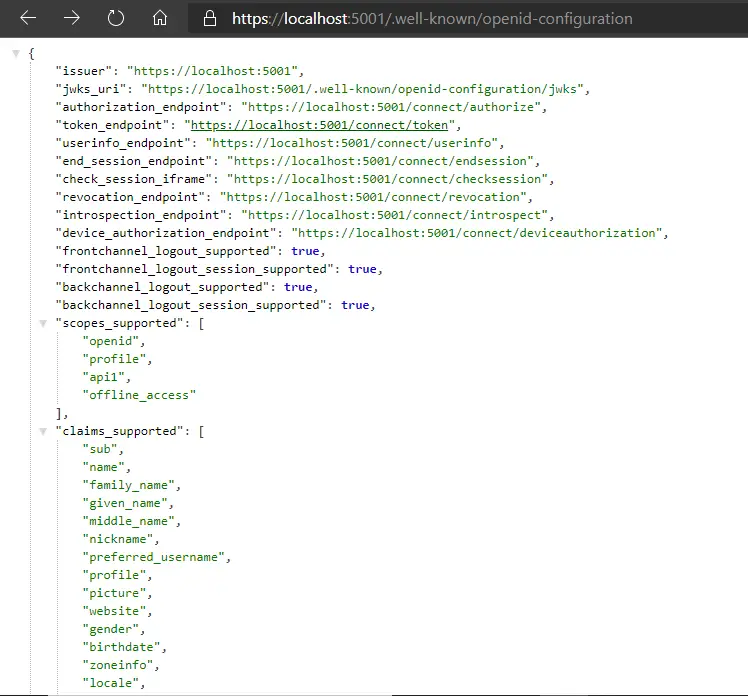
If this Endpoint shows up with a JSON containing a detailed configuration about the endpoints, scopes and other TokenServer metadata, it means that the TokenServer is perfectly configured and is up for access. In the next article, we shall make use of this TokenServer and secure an API by means of client_credentials Authentication Flow.

Found this article helpful? Please consider supporting!

