Email marketing is one of those important strategies applications use for user acquisition. A typical newsletter email with embedded images and formatted text layouts is internally a HTML document rendered over the email body.
When we dig deeper, one can observe that these mails are generated by applying variable email content over a static template based HTML document; depending on the occasion and the data to be sent.
In this article, let’s see how we can develop such an interesting and elegant email sending for an asp.net core application using the already existing features that the MVC library provides us with: the razor engine.
RazorEngine and Templating
An MVC application developed over ASP.NET framework internally uses Razor to render html views and data over layout files during a request. Applications developed using ASP.NET can make use of an external library called RazorEngine which levarages the Razor engine capabilities of the MVC framework.
Although RazorEngine plugin has no direct support for ASP.NET Core, the aspnetcore framework still comes with the razor engine which provides helper methods which can by-produce the rendered HTML over the passed model data and return the plain HTML along.
Getting started with an Example
To demonstrate how this works, let’s take the following example of the ReadersApi in which we shall send the list of Readers available on the ReaderStore to some user over an email template.
Let’s first add the template we want the email to be rendered with. To do this, Let’s create a new folder MailingTemplates under the Views folder and add a new cshtml file called List.cshtml which contains the HTML layout for the email body.
This cshtml file shall be rendered with the data we pass onto the Razor templating framework and fetch the plan HTML out of it.
“When working with Razor views, keep in mind that we need to put the template cshtml files only under Views folder”
@using MailingNinja.Contracts.DTO

@model List<NinjaDTO>

<!DOCTYPE html>
<html>
<head>
    <style>
        .table-bordered {
            --bs-table-bg: transparent;
            --bs-table-accent-bg: transparent;
            --bs-table-striped-color: #212529;
            --bs-table-striped-bg: rgba(0, 0, 0, 0.05);
            --bs-table-active-color: #212529;
            --bs-table-active-bg: rgba(0, 0, 0, 0.1);
            --bs-table-hover-color: #212529;
            --bs-table-hover-bg: rgba(0, 0, 0, 0.075);
            width: 100%;
            margin-bottom: 1rem;
            color: #212529;
            vertical-align: top;
            border-color: #dee2e6;
        }

        .thead {
            background-color: #efefef;
        }

        .header-content {
            background: url('cid:header');
            padding: 5px;
            margin: 5px;
            text-align: center;
            font-size: 2em;
            color: #464646;
        }

        td {
            border-width: 0 1px;
            text-align: center;
        }

        tr, td {
            border-color: inherit;
            border-style: solid;
        }
    </style>
</head>
<body>
    <div class="header-content">
        <p>Please find the below list of Ninjas currently available.</p>
    </div>
    <div>
        <table class="table-bordered">
            <tr class="thead">
                <th>Id</th>
                <th>Name</th>
                <th>Bio</th>
                <th>Class</th>
                <th>ColorCode</th>
                <th>AddedOn</th>
                <th>UpdatedOn</th>
            </tr>
            @foreach (var item in Model)
            {
                <tr>
                    <td>@item.Id</td>
                    <td>@item.Name</td>
                    <td>@item.Bio</td>
                    <td>@item.Class</td>
                    <td>@item.ColorCode</td>
                    <td>@item.AddedOn</td>
                    <td>@item.UpdatedOn</td>
                </tr>
            }
        </table>
    </div>
</body>
</html>
The razor view file receives a model of type List and has the model iterated inside a table body as expected.
Next we shall have a generic ITemplateService which helps us with the rendering and extracting stuff. We first create an interface ITemplateService that sets up the context for the implementation to occur.
namespace MailingNinja.Contracts.Services
{
    public interface ITemplateService
    {
        Task<string> GetTemplateHtmlAsStringAsync<T>(string viewName, T model) where T : class, new();
    }
}
We make sure that the method GetTemplateHtmlAsStringAsync() has a generic model type to be passed to it so that its not coupled with only a single type of model for usage.
Let’s start working on the implementation for this interface, which will bear the template logic to produce plain HTML for an input Model and a View.
First we being with setting up the httpContext on which the razor would work for the rendering. The RazorView works on the ViewContext which requires an instance of the HttpContext.
Steps to follow
To generate HTML based on a View Template and Model, we implement the following steps:
- Setup a HttpContext, followed by an ActionContext
- Find and Set the View on which the rendering would happen
- Setup a ViewDataDictionary in which the Model to be rendered on shall be passed.
- Create a String writer stream and have a ViewContext be created basing on the actioncontext, viewdata and the stringwriter stream
- render the view over the context and have the output be written on the stringwriter
- return the string written and close the stream.
1. Setting up the ActionContext
We make use of the IServiceProvider instance from the aspnetcore container by having it injected through the constructor.
    var httpContext = new DefaultHttpContext() {
            RequestServices = _serviceProvider
        };
    var actionContext = new ActionContext(
            httpContext, new RouteData(), new ActionDescriptor());
2. Setting up the View
We pass the viewName as a parameter to the method into the razorViewEngine.FindView() method which returns a ViewResult. The Razor View Engine searches for the matching views in all of the Views folder and returns a ViewResult object with information related to the fetched View.
    using (StringWriter sw = new StringWriter())
    {
        var viewResult = _razorViewEngine.FindView(
                actionContext, viewName, false);

        if (viewResult.View == null)
        {
            return string.Empty;
        }
    }
If the specified view is not available to the engine, we return with no further processing. Also observe that we use the razorViewEngine which is of type IRazorViewEngine injected via the constructor.
3. Setting up the ViewDataDictionary
We pass the model passed to the method as an argument to the ViewDataDictonary class, which passes the model data to the RazorView for rendering. This ViewDataDictionary is digested by the RazorView Engine over the passed View and a rendered HTML will be produced.
    var metadataProvider = new EmptyModelMetadataProvider();
    var msDictionary = new ModelStateDictionary();
    var viewDataDictionary = new ViewDataDictionary(metadataProvider, msDictionary);

    viewDataDictionary.Model = model;
4. Creating the ViewContext
We create a ViewContext instance based on all the parameters which we have created in earlier steps as arguments. Observe that the
StringWriter is also passed as a constructor parameter to the class which then holds on the rendered plain HTML content for our use.
	var tempDictionary = new TempDataDictionary(actionContext.HttpContext, _tempDataProvider);
  var viewContext = new ViewContext(
                    actionContext,
                    viewResult.View,
                    viewDataDictionary,
                    tempDictionary,
                    sw,
                    new HtmlHelperOptions()
                );
5. Render the View and Return the HTML
We finally render the ViewData available in the ViewContext over the ViewResult created before.
    await viewResult.View.RenderAsync(viewContext);
    return sw.ToString();
Once the rendering is over, the HTML is available on the StringWriter which the method returns for our usage. On the Whole, our final implementation looks like below:
namespace MailingNinja.Core.Services
{
    public class TemplateService : ITemplateService
    {
        private IRazorViewEngine _razorViewEngine;
        private IServiceProvider _serviceProvider;
        private ITempDataProvider _tempDataProvider;

        public TemplateService(
            IRazorViewEngine engine,
            IServiceProvider serviceProvider,
            ITempDataProvider tempDataProvider)
        {
            this._razorViewEngine = engine;
            this._serviceProvider = serviceProvider;
            this._tempDataProvider = tempDataProvider;
        }

        public async Task<string> GetTemplateHtmlAsStringAsync<T>(
          string viewName, T model) where T : class, new()
        {
            var httpContext = new DefaultHttpContext() { RequestServices = _serviceProvider };
            var actionContext = new ActionContext(httpContext, new RouteData(), new ActionDescriptor());

            using (StringWriter sw = new StringWriter())
            {
                var viewResult = _razorViewEngine.FindView(actionContext, viewName, false);

                if (viewResult.View == null)
                {
                    return string.Empty;
                }

                var metadataProvider = new EmptyModelMetadataProvider();
                var msDictionary = new ModelStateDictionary();
                var viewDataDictionary = new ViewDataDictionary(metadataProvider, msDictionary);

                viewDataDictionary.Model = model;

                var tempDictionary = new TempDataDictionary(actionContext.HttpContext, _tempDataProvider);
                var viewContext = new ViewContext(
                    actionContext,
                    viewResult.View,
                    viewDataDictionary,
                    tempDictionary,
                    sw,
                    new HtmlHelperOptions()
                );

                await viewResult.View.RenderAsync(viewContext);
                return sw.ToString();
            }
        }
    }
}
To use this service, We add this to the service collection as a scoped service to be able to inject an instance whenever required.
// Template Service
services.AddScoped<ITemplateService, TemplateService>();
To use the method, we can simply call:
private async Task<string> GetGridContentAsync(IEnumerable<NinjaDTO> data)
{
  var templatePath = "MailingTemplates/List";
  return await _templateService.GetTemplateHtmlAsStringAsync(templatePath, data.ToList());
}
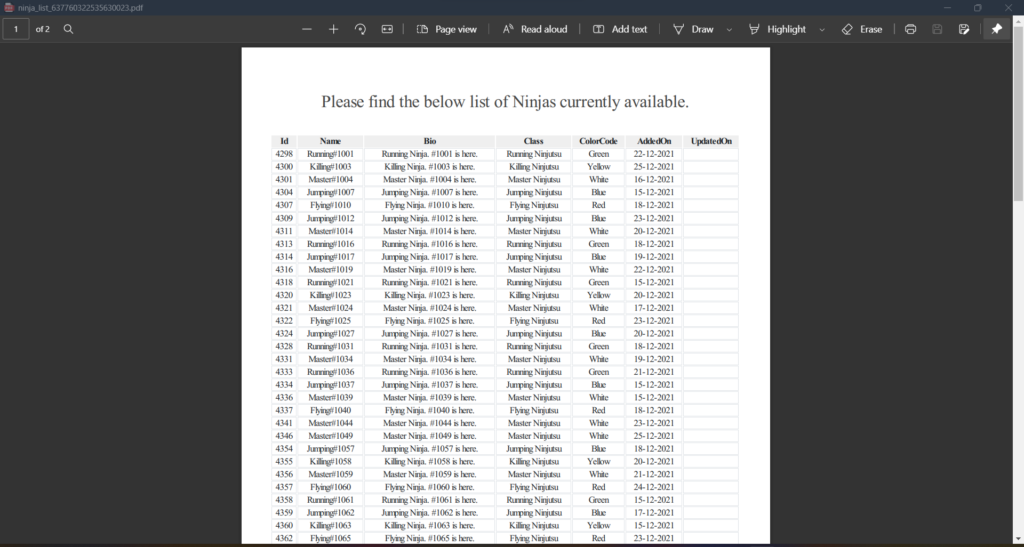
Where the template resides under the Templates folder of Views folder, and the model data is received from the underlying data store. When we export this HTML into a File, the rendered content might look like below:


Found this article helpful? Please consider supporting!
Conclusion and… boilerplate 🥳
This way we can extract rendered HTML from a Razor View using RazorViewEngine within ASP.NET Core MVC. We can then use this extracted HTML content to send out Emails using our own SMTP setup with MailKit or can push this HTML string into third party mailing services.
The code snippets used in this article are a part of a boilerplate solution called MailingNinja, which offers demonstrable implementation of PDF generation and Mailing with ASP.NET Core.
You can check out the repository here. Please do leave a star ⭐ if you find it useful!
MailingNinja – A Boilerplate Repository

