
What is DynamoDB?
Amazon DynamoDB is a key-value and document database offering a fully managed, multi region, multi master, durable database with built-in security, backup and restore, and in-memory caching for internet-scale applications that delivers single-digit millisecond performance at any scale.
– AWS Documentation
To use DynamoDB in our applications, we need to first create a DynamoDB table with a required “HashKey” which acts as a PrimaryKey for all the records we store in the table.
One must obtain an AWS account to create or work with DynamoDB and AWS provides a free 1-year access to its resources for development and evaluation. To learn more about this, visit the AWS Free Tier section.
DynamoDB and .NET SDK –
While DynamoDB supports many of the popular programming languages such as Java, NodeJS, Python and so on, it also provides a rich SDK for integrating with .NET applications, which we can also use in ASP.NET Core.
To use the DynamoDB library inside our applications we need to install the AWSSDK library and we can get started.
Creating a DynamoDB Table –
To create a table in DynamoDB, first sign-in to AWS Console with your credentials and then look for “DynamoDB” in the available services (or search for the same in the search box). Navigate to the DynamoDB section, where you can see a “Create Table” in the top.
Clicking on it would open the form where you need to provide the “table name” identifying your dataset uniquely in the DynamoDB namespace and a “Partition Key” which uniquely identifies a record in the dataset.

You can also add a “Sort Key” which creates a sorting index on the documents. The Partition Key (and the Sort Key if provided) together form the “PrimaryKey” in the table, which uniquely identifies a record in the table.
In a table that has a partition key and a sort key, it’s possible for two items to have the same partition key value. However, those two items must have different sort key values.
– AWS Documentation
The Example –
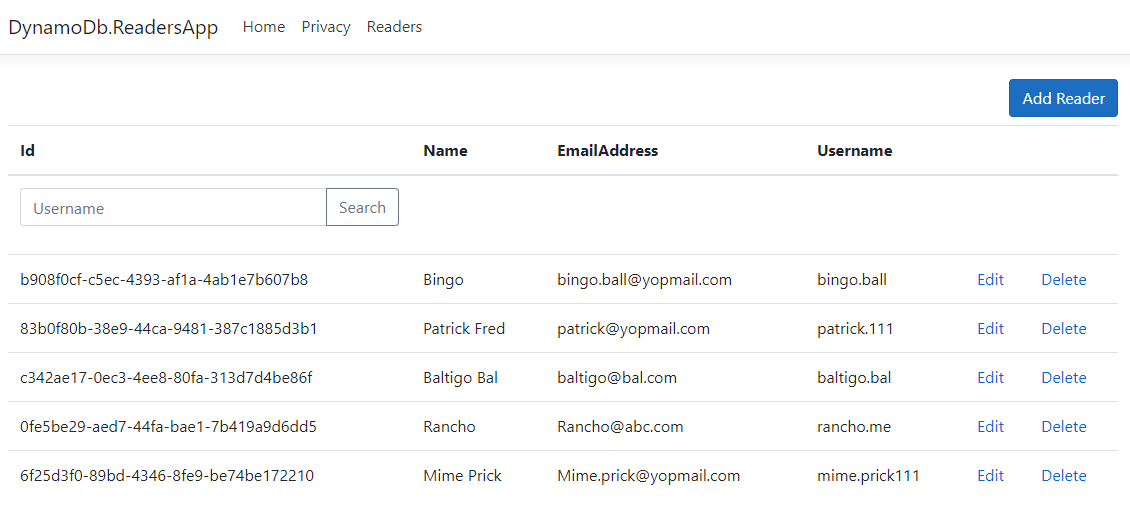
To demonstrate, we shall develop a simple Readers Management Portal where one can View all the Readers registered in the system, Add a new Reader with required attributes, Edit details and even Delete records.
For every entity related operation done on the front-end, a matching operation on DynamoDB is performed using the DynamoDB SDK for .NET.
DynamoDB supports different models in which the entity operations can be performed on the database such as Document Model, Low-level Model and the Object Persistence Model.
For these three models, the Object Persistence Model provides a better high-level approach for working with entities in DynamoDB by means of actual C# entity classes which are mapped to DynamoDB DataModel.
For people like me coming from an Entity Framework Core background, this sounds very familiar and easy to work with. The only con-side for this is that we first need to create our table beforehand in the DynamoDB database and only then we can use this model.
The Object Persistence Model –
In the Object Persistence Model, we use our C# model which is mapped to the respective fields of the document we’re interested in working with inside our DynamoDB table.
This Model acts as a mapping between the DynamoDB table’s documents and translates into an equivalent representation of the C# class, thereby enabling us to work with the DynamoDB data types directly.
For our example, we have a Reader entity which has the below properties. This model is decorated with information related to its DynamoDB counterpart as below:
namespace DynamoDb.Contracts
{
    [DynamoDBTable("test_readers")]
    public class Reader
    {
        [DynamoDBProperty("id")]
        [DynamoDBHashKey]
        public Guid Id { get; set; }

        [DynamoDBProperty("name")]
        public string Name { get; set; }

        [DynamoDBProperty("emailAddress")]
        public string EmailAddress { get; set; }

        [DynamoDBProperty("userName")]
        public string Username { get; set; }

        [DynamoDBProperty("addedOn")]
        public DateTime AddedOn { get; set; }
    }
}
The attribute DynamoDBTable represents the table inside the DynamoDB which this entity should map itself to. In our case we supplied it with the table we just created – “test_readers”. The DynamoDBHashKey attribute indicates the field which acts as the PrimaryKey inside the table, in this case we have our Id field which is mapped against the “id” field inside the table via the DynamoDBProperty attribute.
The Example Solution –
Let’s try to create a solution which follows a Layered/Clean/Onion Architecture model for our example. We have our solution “DynamoDb.ReadersApp” which hosts three projects beneath it.
There are two library projects representing the “Core” layer containing our Domain logic and the “Contracts” layer wrapping all the Model classes being used in the application.
The outermost layer is the Web layer which contains the UI powered by ASP.NET Core MVC / Razor and also wraps the presentation logic.
Our solution contains the Management Portal capable of the following operations against the test_readers table.
- Fetch All Readers
- Fetch a Single Reader
- Edit a Single Reader
- Delete a Single Reader
- Find a Reader by Username
Let’s begin by creating an interface which defines how these functionalities should look like. We’ll call it IReadersRepository
namespace DynamoDb.Contracts.Interfaces
{
    public interface IReadersRepository
    {
        Task<Reader> Single(Guid readerId);
        Task<ReaderViewModel> All(string paginationToken = "");
        Task<IEnumerable<Reader>> Find(SearchRequest searchReq);
        Task Add(ReaderInputModel entity);
        Task Remove(Guid readerId);
        Task Update(Guid readerId, ReaderInputModel entity);
    }
}
This interface is implemented by the ReadersRepository which encapsulates the Data Persistence Logic w.r.t the DynamoDB table a.k.a test_readers.
To get started with DynamoDB we need to install the AWSSDK.DynamoDBv2 library which provides with the necessary API integrations.
> dotnet add package AWSSDK.DynamoDBv2 --version 3.5.0.7
I’m installing this library inside my DynamoDb.Contracts project since this project contains the Entity “Reader” and as this project shall be included inside the DynamoDb.Core project we don’t need to install it twice to use it inside the Core project.
The ReadersRepository implements the IReadersRepository, and inside the constructor we create an instance of AmazonDynamoDBClient and then pass this instance to a DynamoDBContext object. This context is what we use all across our operations similar to a DatabaseContext object.
namespace DynamoDb.Core
{
    public class ReadersRepository : IReadersRepository
    {
        private readonly AmazonDynamoDBClient _client;
        private readonly DynamoDBContext _context;

        public ReadersRepository()
        {
            _client = new AmazonDynamoDBClient();
            _context = new DynamoDBContext(_client);
        }

        ...
    }
This repository implementation is injected into the ReadersController which contains the presentation Logic or the View Logic. To have it injected, we register this repository against the IReadersRepository inside the ConfigureServices() method.
namespace DynamoDb.ReadersApp.Controllers
{
    [Route("[controller]")]
    public class ReadersController : Controller
    {
        private IReadersRepository _repository;

        public ReadersController(IReadersRepository repository)
        {
            _repository = repository;
        }

        /* View Endpoints */

        // GET: ReadersController
        public async Task<ActionResult> Index(
            string userName = "")
        {
        }

        [HttpGet]
        [Route("Create")]
        public IActionResult Create()
        {
        }

        [HttpPost]
        [Route("Create")]
        [ValidateAntiForgeryToken]
        public async Task<ActionResult> Create(
            ReaderInputModel model)
        {
        }

        [HttpGet]
        [Route("Edit/{readerId}")]
        public async Task<ActionResult> Edit(
            Guid readerId)
        {
        }

        // POST: ReadersController/Edit/5
        [HttpPost]
        [Route("Edit/{readerId}")]
        [ValidateAntiForgeryToken]
        public async Task<ActionResult> Edit(Guid readerId,
            ReaderInputModel model)
        {
        }

        [HttpGet]
        [Route("Delete/{readerId}")]
        public async Task<ActionResult> Delete(
            Guid readerId)
        {
        }
    }
}
Retrieve – Fetch All Records & Find by User Name
To fetch all the records from the table, we can use the ScanAsync() method which returns all the records matching to a given set of ScanConditions.
Keep in mind that there is a limit on the number of records to be returned on this operation and as the table grows in size, the scan becomes slower. So our design should be such that we should be able to handle it in a Paginated approach.
While pagination is not supported by the Object Persistence Model directly, we can put in a little “Low-level model” for this purpose and transform the result dataset while still accessing pagination – by means of a paginationToken generated by the SDK to represent the next set to be retrieved.
The All() functionality looks like below:
public async Task<ReaderViewModel> All(
    string paginationToken = "")
{
    // Get the Table ref from the Model
    var table = _context.GetTargetTable<Reader>();

    // If there's a PaginationToken
    // Use it in the Scan options
    // to fetch the next set
    var scanOps = new ScanOperationConfig();
    if (!string.IsNullOrEmpty(paginationToken))
    {
        scanOps.PaginationToken = paginationToken;
    }

    // returns the set of Document objects
    // for the supplied ScanOptions
    var results = table.Scan(scanOps);
    List<Document> data = await results.GetNextSetAsync();

    // transform the generic Document objects
    // into our Entity Model
    IEnumerable<Reader> readers = _context.FromDocuments<Reader>(data);

    // Pass the PaginationToken
    // if available from the Results
    // along with the Result set
    return new ReaderViewModel
    {
        PaginationToken = results.PaginationToken,
        Readers = readers,
        ResultsType = ResultsType.List
    };

    /* The Non-Pagination approach */
    //var scanConditions = new List<ScanCondition>() {
        new ScanCondition("Id", ScanOperator.IsNotNull) };
    //var searchResults = _context.ScanAsync<Reader>(
        scanConditions, null);
    //return await searchResults.GetNextSetAsync();
}
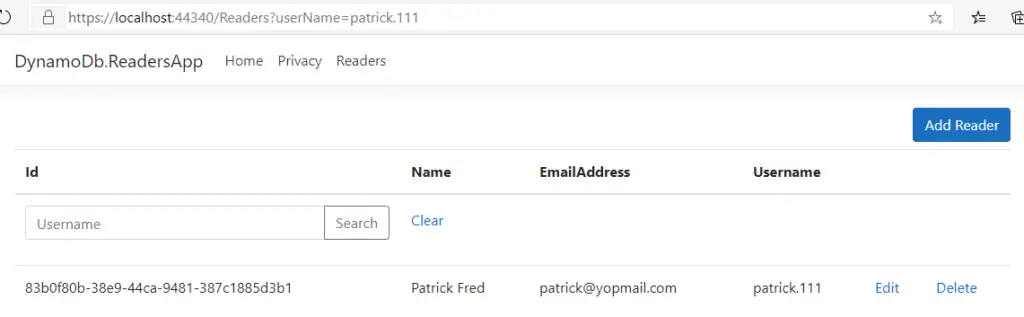
To find for a given Username, we use the Query() method with a filter on the UserName. The functionality looks like below:
public async Task<IEnumerable<Reader>> Find(SearchRequest searchReq)
{
    var scanConditions = new List<ScanCondition>();
    if (!string.IsNullOrEmpty(searchReq.UserName))
        scanConditions.Add(new ScanCondition("Username", ScanOperator.Equal, searchReq.UserName));
    if (!string.IsNullOrEmpty(searchReq.EmailAddress))
        scanConditions.Add(new ScanCondition("EmailAddress", ScanOperator.Equal, searchReq.EmailAddress));
    if (!string.IsNullOrEmpty(searchReq.Name))
        scanConditions.Add(new ScanCondition("Name", ScanOperator.Equal, searchReq.Name));

    return await _context.ScanAsync<Reader>(scanConditions, null).GetRemainingAsync();
}
The SearchRequest model holds three possible filter values on Username, EmailAddress or Name. For now in the View we’re using only the UserName search, which is quite good for starters.
This result model is consumed in the View via the Controller /Index.
// GET: ReadersController
public async Task<ActionResult> Index(string userName = "")
{
    if (!string.IsNullOrEmpty(userName))
    {
        var readers = await _repository.Find(new SearchRequest { UserName = userName });
        return View(new ReaderViewModel
        {
            Readers = readers,
            ResultsType = ResultsType.Search
        });
    }
    else
    {
        var readers = await _repository.All();
        return View(readers);
    }
}
In the View, we would want to offer user an option to clear the search results and instead go for full data view. The ResultsType enum indicates whether the ViewModel is a result of Search or is a normal List view. Based on this, we can toggle the link to clear the Search results.
CUD – Insert, Update, Delete –
Since these operations involve only a single Record from the table, we can complete these using our Persistence Model directly. The Insert functionality uses the Add() function from the IReadersRepository which is as below:
public async Task Add(ReaderInputModel entity)
{
    var reader = new Reader
    {
        Id = Guid.NewGuid(),
        Name = entity.Name,
        EmailAddress = entity.EmailAddress,
        AddedOn = DateTime.Now,
        Username = entity.Username
    };

    await _context.SaveAsync<Reader>(reader);
}
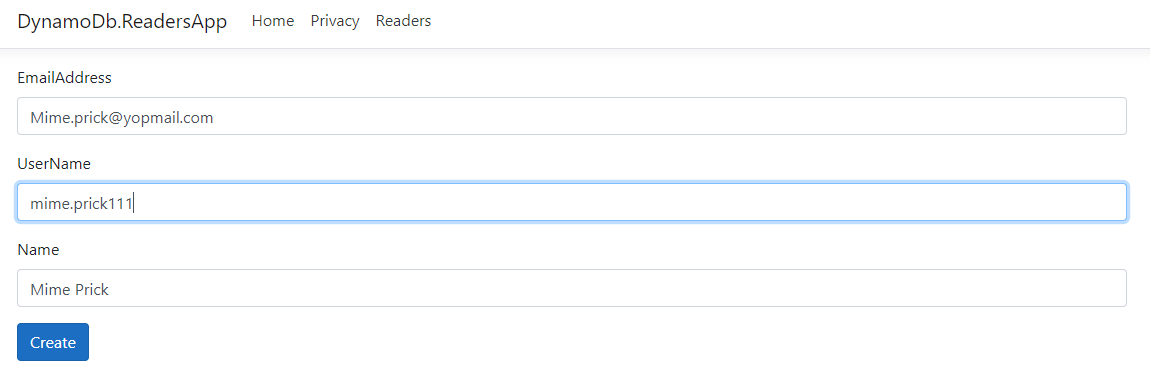
The ReaderInputModel is a ViewModel which takes the inputs UserName, EmailAddress and Name from a new Reader entry.
namespace DynamoDb.Contracts
{
    public class ReaderInputModel
    {
        public string Name { get; set; }
        public string Username { get; set; }
        public string EmailAddress { get; set; }
        public InputType InputType { get; set; }
    }
}
And the Controllers to show the View and then POST the data look like below:
[HttpGet]
[Route("Create")]
public IActionResult Create()
{
    return View("~/Views/Readers/CreateOrUpdate.cshtml");
}

[HttpPost]
[Route("Create")]
[ValidateAntiForgeryToken]
public async Task<ActionResult> Create(ReaderInputModel model)
{
    try
    {
        if (!ModelState.IsValid)
            return View("~/Views/Readers/CreateOrUpdate.cshtml", model);

        await _repository.Add(model);
        return RedirectToAction(nameof(Index));
    }
    catch
    {
        return View("~/Views/Readers/CreateOrUpdate.cshtml", model);
    }
}
The InputType is an enum which differentiates the ViewModel between an Insert payload and an Update payload. This is because i’d chosen to reuse the same Insert view for Edit as well 🙂
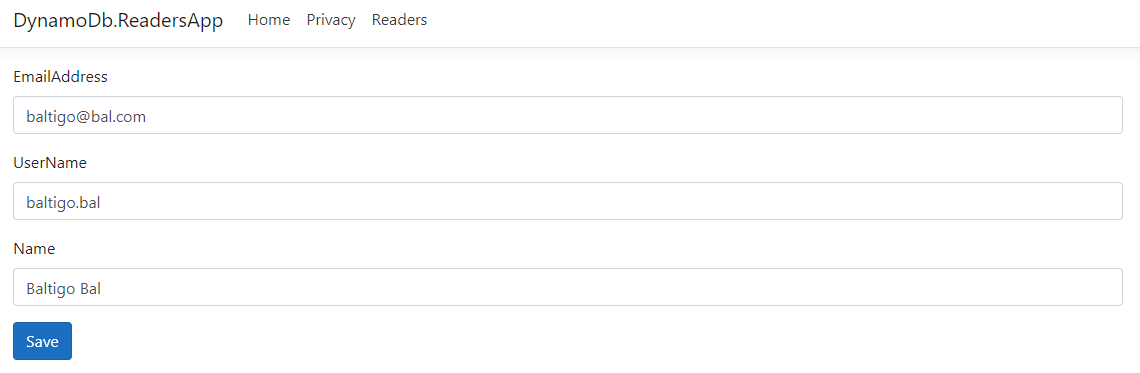
The Update operation involves three steps:
- Retrieve the record for the passed in readerId
- Update the values passed from the View into the fetched record
- Save the changed record
public async Task<Reader> Single(Guid readerId)
{
    return await _context.LoadAsync<Reader>(readerId);
}

public async Task Update(Guid readerId,
    ReaderInputModel entity)
{
    var reader = await Single(readerId);
    reader.EmailAddress = entity.EmailAddress;
    reader.Username = entity.Username;
    reader.Name = entity.Name;

    await _context.SaveAsync<Reader>(reader);
}
On the View side, we have two Controllers for this functionality which Loads the available Reader data from the datastore and then posts the updated values to the repository.
[HttpGet]
[Route("Edit/{readerId}")]
public async Task<ActionResult> Edit(Guid readerId)
{
    var reader = await _repository.Single(readerId);
    ViewBag.ReaderId = readerId;

    return View(
        "~/Views/Readers/CreateOrUpdate.cshtml",
        new ReaderInputModel
        {
            EmailAddress = reader.EmailAddress,
            Name = reader.Name,
            Username = reader.Username,
            InputType = InputType.Update
        });
}

[HttpPost]
[Route("Edit/{readerId}")]
[ValidateAntiForgeryToken]
public async Task<ActionResult> Edit(Guid readerId,
    ReaderInputModel model)
{
    try
    {
        if (!ModelState.IsValid)
            return View("~/Views/Readers/CreateOrUpdate.cshtml", model);

        await _repository.Update(readerId, model);
        return RedirectToAction(nameof(Index));
    }
    catch
    {
        return View("~/Views/Readers/CreateOrUpdate.cshtml", model);
    }
}
Deleting a Record –
The simplest among the bunch is the “Delete” where we can delete an individual record whose readerId is supplied from the View when one taps on the “Delete” link.
The functionality looks like below:
public async Task Remove(Guid readerId)
{
    await _context.DeleteAsync<Reader>(readerId);
}
This method is called from the Controller endpoint as:
[HttpGet]
[Route("Delete/{readerId}")]
public async Task<ActionResult> Delete(Guid readerId)
{
    await _repository.Remove(readerId);
    return RedirectToAction(nameof(Index));
}
Conclusion
DynamoDB is one of the fastest document database service offered by AWS which finds its use in many of the popular applications in the market. With its rich SDK for .NET, DynamoDB provides arguably one of the simplest approach to get started in the world of NoSQL.
In this article, we have seen in-detail by means of a full-fledged application how we can play around with the records and data from a DynamoDB table by means of its Object Persistence Model, which personally gives me all the EF Core vibes.
The complete example used in this article is available under https://github.com/referbruv/aspnetcore-dynamodb-boilerplate.
You can use this application as a boilerplate for your exploration in the world of AWS and DynamoDB.

