
When we try to deploy an ASP.NET Core application using the self-hosted approach via the dotnetcore CLI, the result is a kind-of a windows service. You have your application running inside a terminal (or a command-prompt) window listening over a configured PORT for requests.
When you close this terminal (or the command-prompt) the application shuts down, which is kind-of meh when you want to run a production-grade API or Web application.
It’s much better and safer to use a reverse proxy based approach, where the ASP.NET Core application resides inside a standard webserver. This webserver acts like a container for the application, which runs on its own kestrel server instance.
This approach is such that any request from outside world is received by the hosting web server (such as IIS, Ngnix or Apache) which internally routes the request to the application running inside a kestrel web server module.
Read: Hosting ASP.NET Core Application using CLI and Kestrel
This approach provides an additional layer of security and abstraction, in addition to making use of the additional features of a full-fledged web server such as IIS or Ngnix which offer much more such as server variables or preprocessing or others. For deploying an ASP.NET Core application to a webserver we require to install the below things to keep things going:
How to deploy an ASP.NET Core application in IIS?
Here’s a step-by-step process to deploy your ASP.NET Core application in IIS.
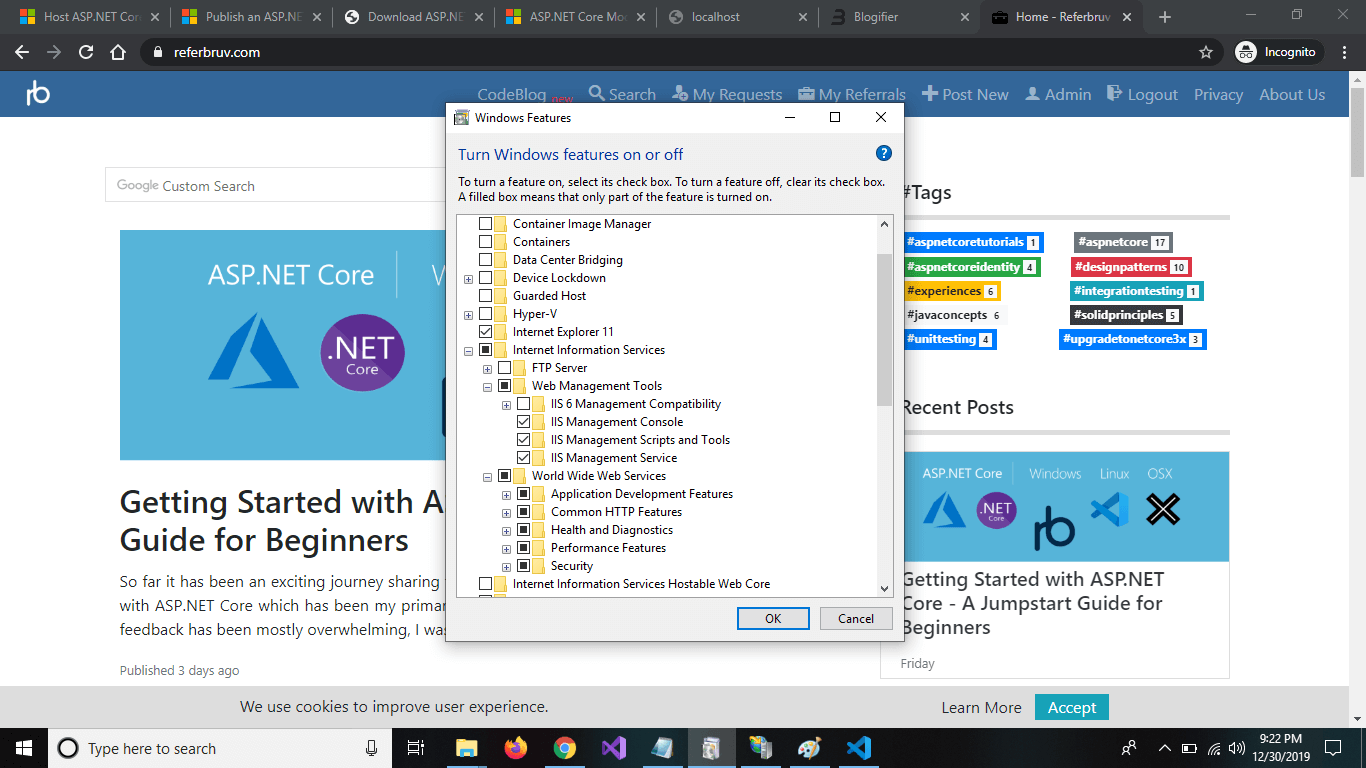
- Configure the IIS: The Internet Information Services (IIS) is a Microsoft offered Web Server that comes built into most of the Windows operating systems. It helps in maintaining and providing a container or the environment on which any web application written in a server-side scripting language such as ASP, PHP etc runs. The IIS is disabled by default in most of the systems (except if its a server operating system such as Windows Server 20xx) and can be enabled by checking into the Turn Windows Features On / Off and ticking the checkbox for Internet Information Services On.
- Download and install the ASP.NET Core Web Hosting Bundle: this provides all the necessary modules required for communication between the IIS and the Kestrel in which the application resides and works. You can download the hosting bundle from the official ASP.NET website
In general, there are two modes in which an ASP.NET Core application can run.
In-Process model:
the application is hosted inside the IIS process and all the functioning happens from here. This is similar to any other general website deployed in IIS (through binaries).
Out-Of-Process model:
the application resides within the Kestrel Shell layer, and the IIS server acts as a reverse-proxy – all the requests travel from within the IIS Web server which is available to the outside internet, and the proccessing happens within the Kestrel.
To explicitly specify the mode we want our application to run, we provide it inside our Web project CSPROJ file. It can look something like thisL
<Project Sdk="Microsoft.NET.Sdk.Web">
  <PropertyGroup>
    <TargetFramework>netcoreapp3.1</TargetFramework>
    <AspNetCoreHostingModel>OutOfProcess</AspNetCoreHostingModel>
    <AspNetCoreModuleName>AspNetCoreModule</AspNetCoreModuleName>
  </PropertyGroup>

  .... other config ....
</Project>
If we don’t specify the type of hosting model we’re into, the ASP.NET Core bundle hosts the application in an In-Process manner.
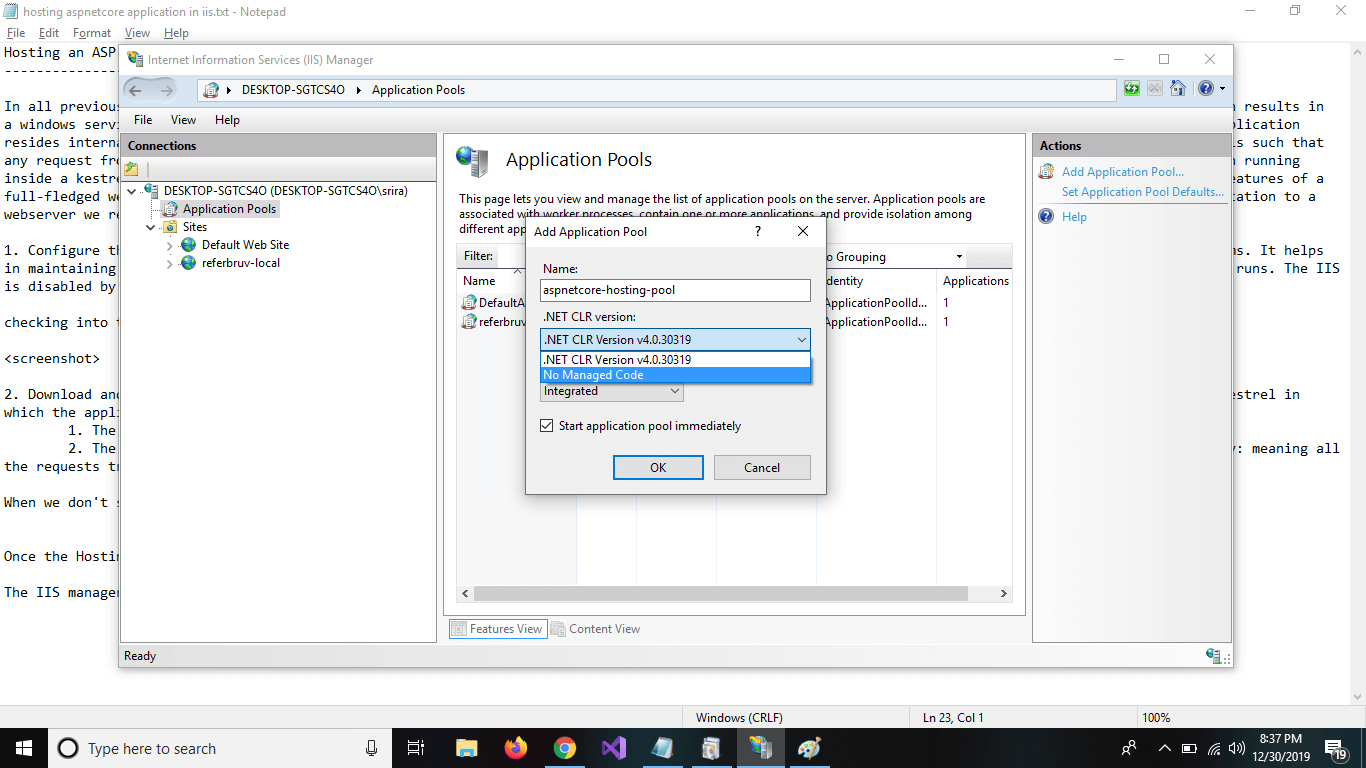
- Once the Hosting bundle is installed and the IIS is running, type inetmgr in the Run (Windows + R) window. The IIS manager window opens. Expand on the Server that shows up in the left panel and right click on Application Pools. Select Add Application Pool.
An Application Pool is an IIS Process on which the applications reside and execute. On the New Application Pool dialog, enter the app pool name and select "No Managed Code" from the list. And then click on Save. A new Process which can handle an ASP.NET Core application is now created. Now we shall create a new website and add it to the created app pool.
- Copy the application executables into a folder on top of which we shall create a website in IIS. We obtain the binaries by publishing our application with the below command within the project directory.
> dotnet publish -c Release
This generates the executables into the output path under /bin/release/netcoreappX.Y/publish/ path.
Copy all that content into the path C:inetpubwwwrootMyAspNetCoreApp folder. Observe that once we enable IIS in our hosting machine, the inetpub directory with all its sub directories is created. This is where the IIS manager operates by default for the web applications.
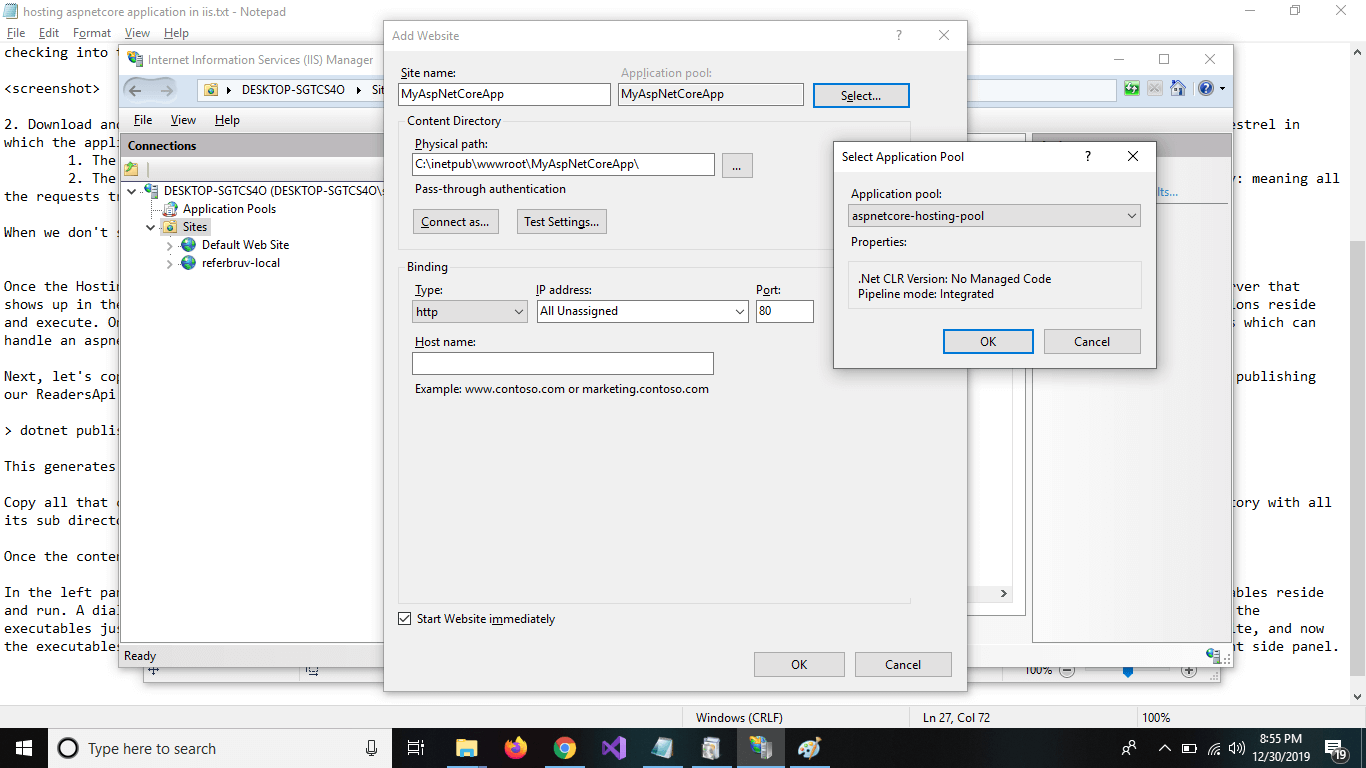
- Once the contents are copied, create a Website and use the Physical Path above to point for under which the web application operates.
In the left panel that shows server details, right click on the Sites folder and select Add Websites. This is a container in which the application executables reside and run. A dialog appears which is configuration for the to-be-created website.
Specify the website name and the Physical Path under which we have placed the executables just now. And click on "select" next to the Application Pools and select the App Pool we created previously. Click on Save to create the website, and now the executables run under the container website using the process as in the app pool. To check the website, click on Browse option that occurs on the right side panel.
Now we should see our readersApi application up and running similar to any website. If something goes wrong, we get the error screen with 502.5 error code.
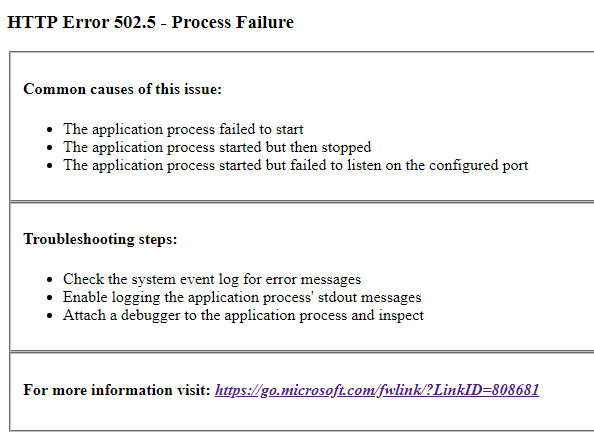
How to troubleshoot a broken IIS Deployment? (502.5 errors)
For that, we can have a few extra steps within our code, to troubleshoot in such scenarios.
In Program.cs when we create the WebHostBuilder for building the application, we can add two extra chaining methods which can help provide the stacktrace for us.
public static IWebHostBuilder CreateWebHostBuilder(string[] args) =>
    WebHost.CreateDefaultBuilder(args)
	.UseIISIntegration()
	.UseKestrel()
	// add additional chain methods which capture startup errors
	.UseSetting("detailedErrors", "true")
	.CaptureStartupErrors(true)
        .UseStartup<Startup>();
or in the newer dotnetcore3.x we have
Host.CreateDefaultBuilder(args)
	.ConfigureWebHostDefaults(wb =>
		{
			wb.UseStartup<Startup>();
			wb.UseSetting("detailedErrors", "true");
			wb.CaptureStartupErrors(true);
			wb.UseIISIntegration();
		}
	);
In either case, when we add CaptureStartupErrors() chain method to the WebHost, any errors which occur during the app startup is captured by the IIS and put into Logs which can be viewed via Windows Event Viewer. This can help in getting a clear picture of what is happening during the application startup.
Pro tip: If all of these fails, we can use the dotnet core CLI hack to run it as a self-hosted application and see for ourselves what has gone wrong. Within the physical directory of the executables, we can run:
dotnet ./readersapi.dll --urls=http://0.0.0.0:5000
which can run the application as a self-hosted application under the url http://localhost:5000 or the http://ip-of-the-system:5000
This can easily help us troubleshoot the issues. But the downside is that this approach works only when we have total control over the hosting system environment.
But when we are deploying over to a remote host environment or a cloud environment such as Azure app service, the above two method chains help us accurately find the issues.

