Introduction
In the previous article, we have been looking at how we can read from an azure storage container and use it within an ASP.NET Core application. This is a continuation from where we left previously, so we suggest you to take a look at that part first.
For starters, Microsoft Azure Storage is a storage service offered by Microsoft Azure as a part of its Cloud Suite of tools and services providing a high speed, secure and reliable data storage option for applications.
It provides storage options for developers to write or read data from various data structures such as Tables, File Containers or Queues.
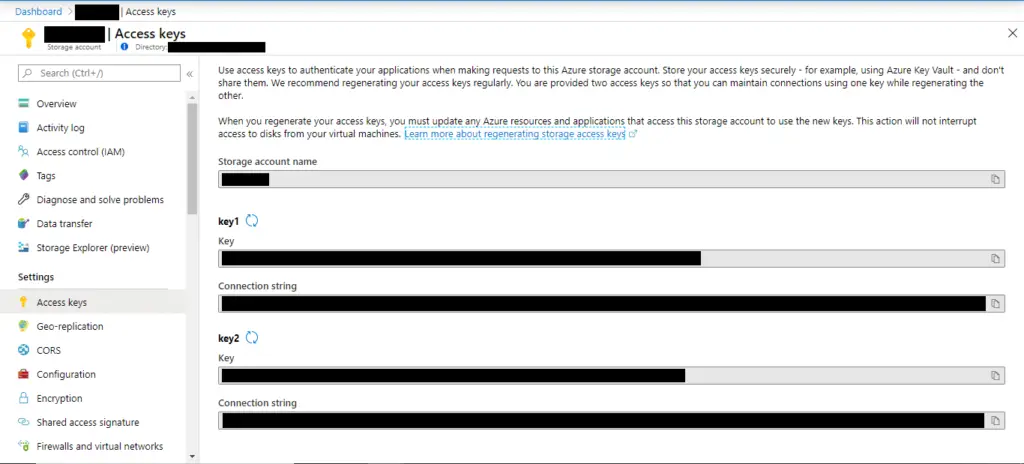
Using WindowsAzure.Storage SDK, developers can access the Storage programmatically to read or write files onto containers within a specific storage account by via a Connection String and Storage library.
How to write a simple File to Azure Storage from ASP.NET Core
For our requirement, we have designed an interface IFileManager which shall be used by the calling components to impose data abstraction. The IFileManager interface is as follows:
namespace ReadersMvcApp.Providers.FileManager
{
    public interface IStorageManager
    {
        Task<string> WriteTo(string fileName, string content);
        Task<string> ReadFrom(string fileName);
    }
}
and we have so far implemented the ReadFrom() functionality in an implementation class AzureBlobStorageManager which derives from the IFileManager interface.
In order to write content to some file in a container, we’d follow steps similar to how we had done for reading an existing file. But we’d have to check if the container specified to write into exists or not. If not exists, we’d create a container and then write file onto it.
The steps we follow shall be as follows
- Create Connection with the Storage using the ConnectionString
- Get Specified Container Instance from the Storage
- Check if the Container exists or not.
- If the Container doesn’t exist – create it and get the reference of the created container
- Write to a file with the specified fileName within the Container using the created Container Instance
The first two steps are implemented in the same way as below:
string blobStorageConnString = _config["AzureBlobStorage:ConnectionString"].ToString();
string containerName = _config["AzureBlobStorage:ContainerName"].ToString();

CloudStorageAccount account = null;

// Lookup for a CloudStorageAccount for the given ConnectionString
// if available fetch out the Account reference
// under the _csAccount
if (CloudStorageAccount.TryParse(blobStorageConnString, out account))
{
    // create a Client to access the Containers from the Account
    CloudBlobClient cloudBlobClient = account.CreateCloudBlobClient();

    // get the container reference from the account via the client
    CloudBlobContainer container = cloudBlobClient.GetContainerReference(containerName);
Now we would need to check if the container reference assigned to the variable container really exists or not. If not we would need to create a new container and have public access limited to the file level.
// check if container exists or not
if (!await container.ExistsAsync())
{
    // create container for the given name
    await container.CreateAsync();

    // set the container permissions for public
    // restricted to blob level only
    BlobContainerPermissions permissions = new BlobContainerPermissions
    {
        PublicAccess = BlobContainerPublicAccessType.Blob
    };

    await container.SetPermissionsAsync(permissions);
}
This handles the scenario when the specified container doesn’t exist for us to write onto. The created container now can be used to write the file. We’d then pickup a BlockReference and upload content onto it. Since we’re pushing in text content onto the container, we’d invoke the method UploadTextAsync() onto the BlockReference instance.
This operation is sort of a CreateOrUpdate functionality – meaning if there’s an already existing file with the specified name, it’d just overwrite the file with the new content, otherwise creates a new file with the specified name and extension. So no worries about issues.
// get the blob reference - creates a blob in the container
CloudBlockBlob blockBlob = container.GetBlockBlobReference(fileName);

// write content to the blob
await blockBlob.UploadTextAsync(content);
The overall functionality looks like below:
public async Task<string> WriteTo(string fileName, string content)
{
    try
    {
        string blobStorageConnString = _config["AzureBlobStorage:ConnectionString"].ToString();
        string containerName = _config["AzureBlobStorage:ContainerName"].ToString();

        CloudStorageAccount account = null;

        // Lookup for a CloudStorageAccount for the given ConnectionString
        // if available fetch out the Account reference
        // under the _csAccount
        if (CloudStorageAccount.TryParse(blobStorageConnString, out account))
        {
            // create a Client to access the Containers from the Account
            CloudBlobClient cloudBlobClient = account.CreateCloudBlobClient();

            // get the container reference from the account via the client
            CloudBlobContainer container = cloudBlobClient.GetContainerReference(containerName);

            // check if container exists or not
            if (!await container.ExistsAsync())
            {
                // create container for the given name
                await container.CreateAsync();

                // set the container permissions for public
                // restricted to blob level only
                BlobContainerPermissions permissions = new BlobContainerPermissions
                {
                    PublicAccess = BlobContainerPublicAccessType.Blob
                };

                await container.SetPermissionsAsync(permissions);
            }

            // get the blob reference - creates a blob in the container
            CloudBlockBlob blockBlob = container.GetBlockBlobReference(fileName);

            // write content to the blob
            await blockBlob.UploadTextAsync(content);

            return blockBlob.Uri.AbsoluteUri;
        }
    }
    catch (Exception ex)
    {
        Console.WriteLine(ex);
    }

    return string.Empty;
}
Observe that we’re returning blockBlob.Uri.AbsoluteUri once the file write is over. This uri represents a hosted blob url for the uploaded file which is publicly available for read access.
Conclusion
Finally, we can use this functionality in a calling component as:
var content = "This is some text we would find in the cloud soon!";

IFileManager manager = services.GetService<IFileManager>();
var data = await manager.WriteTo("myFile.txt", content);
This way, we can write content onto a new or existing file in an Azure Storage using the WindowsAzure.Storage library in an aspnetcore application for a given container and fileName.

