
Table of Contents
Introduction
While writing validations for a View Model in a .NET Core MVC application that takes input from the user, its a general tendency to add Data Annotations decorated over the properties for validations.
These are the go-to approach since times, but are sometimes annoying and complicate the View Model types since the Model now has more than one responsibility onto it.
For example, a simple model such as below now has two responsibilities – one to hold the data and the second is to also hold its validation logic.
This is in a way against the Single Responsibility Principle (SRP) and it also grows ugly as the model size increases and more validations are stacked on to the properties.
public class ProfileVm
{
    [Required]
    public string FirstName { get; set; }

    [Required]
    public string LastName { get; set; }

    [Required, EmailAddress]
    public string EmailAddress { get; set; }

    [Required, MaxLength(10)]
    public string PhoneNumber { get; set; }
}
What is Fluent Validation?
Fluent Validation is a small validation library for .NET applications that uses a fluent interface and lambda expressions for building validation rules. It helps developers in writing complex and meaningful validation rules for the View Models, without having to clutter the View Model class.
Using Fluent, we can have all these validation rules on a View Model inside a separate implementation and thus keeping the View Model types strictly for holding the data. This also helps in a better structured application tiers.
Advantages of using Fluent Validation
- Light weight
- Easy to use
- Open sourced
- Fully compatible and
- an efficient alternative for validations in .NET
In this article, we shall focus on building validation rules for an ASP.NET Core MVC application which accepts a model from the user view. We can also achieve a similar feat for WebAPI applications as well, which we shall look into later.
Building a User Profile Form with AspNetCore MVC
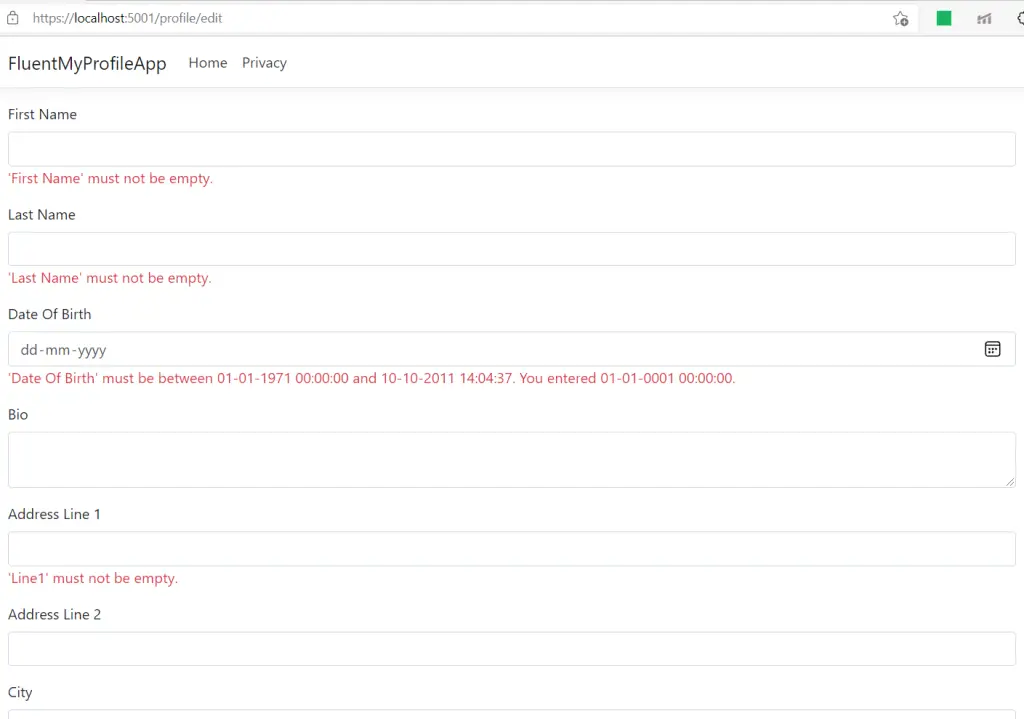
To understand better, let’s take the example of a User Profile page, where the end user adds details to the system. The Profile page contains multiple fields such as name, email, contact number, address and so on.
We would need to add validations over these input fields so that proper input could be added to the system. We’ll use Fluent Validation library to add validations to the ViewModel that binds the data from the front-end to the back-end controller.
To get started, let’s begin by creating a new ASP.NET Core MVC (Model-View-Controller) application. I use dotnetcore CLI to create a new project.
> dotnet new mvc --name FluentMyProfileApp
The command creates a new MVC project with all required assets loaded. To this application, let’s a Profile Edit page where we shall add all the input fields for the user to enter and for the system to validate.
The form should be accessible over /profile/edit route, so we’d add new Profile Controller class that extends Controller and add an action method Edit which is a HttpGet route.
The overloaded Edit action takes in a View Model class ProfileVm, which has the user input bound onto the properties.
The ProfileVm class looks like below:
namespace FluentMyProfileApp.Models
{
    public class ProfileVm
    {
        public string FirstName { get; set; }
        public string LastName { get; set; }
        public DateTime DateOfBirth { get; set; }
        public string EmailAddress { get; set; }
        public string Bio { get; set; }
        public AddressInfo PrimaryAddress { get; set; }
        public string PhoneNumber { get; set; }
        public DateTime LastUpdated { get; set; }
    }

    public class AddressInfo
    {
        public string Line1 { get; set; }
        public string Line2 { get; set; }
        public string City { get; set; }
        public string State { get; set; }
        public string Country { get; set; }
        public string Pincode { get; set; }
    }
}
The ProfileVm class has all the typical attributes that are expected from a Profile page. Also, the Address section is seperated into its own class AddressInfo, so as to have reusability and separation.
The Controller is a simpler implementation and looks like below:
namespace FluentMyProfileApp.Controllers
{
    public class ProfileController : Controller
    {
        public IActionResult Index()
        {
            return View();
        }

        public IActionResult Edit()
        {
            return View();
        }

        [HttpPost]
        public IActionResult Edit(ProfileVm profile)
        {
            if(!ModelState.IsValid)
            {
                return View(profile);
            }

            /*
             *  save functionality comes here
             */
            return View();
        }
    }
}
The UI is a cshtml file in which the controls are binded using Razor and TagHelpers as below:
@model FluentMyProfileApp.Models.ProfileVm

<form method="post">
    <div class="form-group">
        <label asp-for="FirstName">First Name</label>
        <input class="form-control" asp-for="FirstName" type="text" />
        <span class="text-danger" asp-validation-for="FirstName"></span>
    </div>
    <div class="form-group">
        <label asp-for="LastName">Last Name</label>
        <input class="form-control" asp-for="LastName" type="text" />
        <span class="text-danger" asp-validation-for="LastName"></span>
    </div>
    <div class="form-group">
        <label asp-for="DateOfBirth">Date Of Birth</label>
        <input class="form-control" asp-for="DateOfBirth" type="date" />
        <span class="text-danger" asp-validation-for="DateOfBirth"></span>
    </div>
    <div class="form-group">
        <label asp-for="Bio">Bio</label>
        <textarea class="form-control" asp-for="Bio"></textarea>
        <span class="text-danger" asp-validation-for="Bio"></span>
    </div>
    <div class="form-group">
        <label asp-for="PrimaryAddress.Line1">Address Line 1</label>
        <input class="form-control" asp-for="PrimaryAddress.Line1" />
        <span class="text-danger" asp-validation-for="PrimaryAddress.Line1"></span>
    </div>
    <div class="form-group">
        <label asp-for="PrimaryAddress.Line2">Address Line 2</label>
        <input class="form-control" asp-for="PrimaryAddress.Line2" />
        <span class="text-danger" asp-validation-for="PrimaryAddress.Line2"></span>
    </div>
    <div class="form-group">
        <label asp-for="PrimaryAddress.City">City</label>
        <input class="form-control" asp-for="PrimaryAddress.City" />
        <span class="text-danger" asp-validation-for="PrimaryAddress.City"></span>
    </div>
    <div class="form-group">
        <label asp-for="PrimaryAddress.State">State</label>
        <input class="form-control" asp-for="PrimaryAddress.State" />
        <span class="text-danger" asp-validation-for="PrimaryAddress.State"></span>
    </div>
    <div class="form-group">
        <label asp-for="PrimaryAddress.Country">Country</label>
        <input class="form-control" asp-for="PrimaryAddress.Country" />
        <span class="text-danger" asp-validation-for="PrimaryAddress.Country"></span>
    </div>
    <div class="form-group">
        <label asp-for="PrimaryAddress.Pincode">Pincode</label>
        <input class="form-control" asp-for="PrimaryAddress.Pincode" />
        <span class="text-danger" asp-validation-for="PrimaryAddress.Pincode"></span>
    </div>
    <div class="form-group">
        <label asp-for="EmailAddress">Email Address</label>
        <input class="form-control" asp-for="EmailAddress" type="email" />
        <span class="text-danger" asp-validation-for="EmailAddress"></span>
    </div>
    <div class="form-group">
        <label asp-for="PhoneNumber">Phone Number</label>
        <input class="form-control" asp-for="PhoneNumber" type="text" />
        <span class="text-danger" asp-validation-for="PhoneNumber"></span>
    </div>
    <button class="btn btn-primary" type="submit">Save Changes</button>
</form>
The components created until now are similar to what we’d have done without Fluent, and so far we haven’t added any validations over the data that is posted to the controller from the view.
Installing Fluent in ASP.NET Core
To add validations via Fluent, let’s start by installing the necessary Fluent library to AspNetCore. The package is installed as below:
> dotnet add package FluentValidation.AspNetCore
We’re currently working on .NET 5 based project, so we’d have v10.3.3 of Fluent installed. Once this is done, we’d register Fluent service over the MVC service in Startup class as below:
public void ConfigureServices(IServiceCollection services)
{
    services.AddControllersWithViews();

    services.AddFluentValidation(x =>
    {
        /* more to come here */
    });
}
Now we have installed Fluent library into our application and have also registered to use the service. We need to now add the implementation over our ViewModel so that the validation kicks in when the form is submitted.
Building the Validators for Profile View Model
One advantage of using Fluent is that the validators are separated from the View Models and so the model class is not cluttered with validation annotations or its logic. Instead we pass in the target Model type to the validators as type parameters.
For our ProfileVm, let’s add a validator class called ProfileVmValidator which contains the validation logic for the ProfileVm model. This resides under a folder Validators inside the Models for separation.
using FluentValidation;
using System;

namespace FluentMyProfileApp.Models.Validators
{
    public class ProfileVmValidator : AbstractValidator<ProfileVm>
    {
        public ProfileVmValidator()
        {
            RuleFor(x => x.FirstName).NotEmpty();
            RuleFor(x => x.LastName).NotEmpty();
            RuleFor(x => x.EmailAddress).NotEmpty().EmailAddress();
            RuleFor(x => x.PhoneNumber).NotEmpty();
            RuleFor(x => x.DateOfBirth).InclusiveBetween(new DateTime(1971, 1, 1), DateTime.Now.AddYears(-10));
        }
    }
}
The ProfileVmValidator class extends AbstractValidator class which accepts a type argument of ProfileVm (the type for which the Validator is being created). Inside the constructor, we add the validation rules in the form of a method RuleFor() which accepts a Lambda function of the property over which the Rule is to be applied. Chained to it the Validation we’d want to apply for the property.
There are several built-in validator functions available, such as NotEmpty(), NotNull(), EmailAddress() which checks if the input property is a proper EmailAddress, InclusiveBetween() which accepts a Date range and expects the property (which should be a Date type) falls between the range.
Next, inside the Startup class where we’ve registered the Fluent service we need to add this Validator to be considered.
services.AddFluentValidation(x =>
{
    x.DisableDataAnnotationsValidation = true;
    x.RegisterValidatorsFromAssemblyContaining<ProfileVmValidator>();
});
Just to mention, the DisableDataAnnotationsValidation is optional and sets the MVC to ignore all DataAnnotations for validation errors. This is for case when we’d use only Fluent service for model validations.
Once this is done, we’re now good to go for validation on the ProfileVm model. When the data is submitted to the controller the Validator which is linked to the ProfileVm is invoked, and the validation errors that are created for the properties are added to the ModelState.
Back in the controller when we check for ModelState.IsValid property, Fluent adds these errors and updates the state implicitly so the flag is already a result of Fluent execution. Quite simple isn’t it!
Validating Nested properties
Although this setup works, we still haven’t added validations for the Address section, which falls under the AddressInfo class and is a nested property of the ViewModel. For this, we can add a separate Validator for the AddressInfo class and set the ProfileVmValidator to use the Validator created for AddressInfo class while executing its set of validations.
namespace FluentMyProfileApp.Models.Validators
{
    public class AddressInfoValidator
        : AbstractValidator<AddressInfo>
    {
        public AddressInfoValidator()
        {
            RuleFor(x => x.Line1).NotEmpty();
            RuleFor(x => x.City).NotEmpty();
            RuleFor(x => x.State).NotEmpty();
            RuleFor(x => x.Country).NotEmpty();

            RuleFor(x => x.Pincode).NotEmpty()
                .MinimumLength(6)
                .MaximumLength(6)
                .Must(x =>
                    !string.IsNullOrEmpty(x) && Regex.IsMatch(x, @"^d")).WithMessage("Invalid Pincode"); } } }
In AddressInfo model, we have the Pincode property which we’d need to add a specific set of validations such as:
- should be of exactly 6 characters in length (atleast in here)
- must contain only integers
For this we can add a chain of validator functions MinimumLength(), MaximumLength() over the property and also add a custom validation logic which we place under the Must() method as a lambda expression. Finally when this validation fails, we can add a custom message using the WithMessage() method.
We’d now pass an instance of this validator class set to the ProfileVmValidator class through Dependency Injection and pass this instance on the AddressInfo property inside the ProfileVm class as a parameter to the SetValidator() method.
using FluentValidation;
using System;

namespace FluentMyProfileApp.Models.Validators
{
    public class ProfileVmValidator : AbstractValidator<ProfileVm>
    {
        public ProfileVmValidator(IValidator<AddressInfo> addressInfoValidator)
        {
            RuleFor(x => x.FirstName).NotEmpty();
            RuleFor(x => x.LastName).NotEmpty();
            RuleFor(x => x.EmailAddress)
                .NotEmpty()
                .EmailAddress();

            RuleFor(x => x.PhoneNumber).NotEmpty();

            RuleFor(x => x.DateOfBirth)
                .InclusiveBetween(
                    new DateTime(1971, 1, 1), DateTime.Now.AddYears(-10));

            RuleFor(x => x.PrimaryAddress)
                .SetValidator(addressInfoValidator);
        }
    }
}
Also, we’d modify the Fluent service in the startup service to trigger validation to child attributes as below:
services.AddFluentValidation(x =>
{
    x.DisableDataAnnotationsValidation = true;
    x.ImplicitlyValidateChildProperties = true;
    x.RegisterValidatorsFromAssemblyContaining<ProfileVmValidator>();
});
Conclusion and… boilerplate 🥳
Fluent Validation library helps developers in separating the validation logic from the Model classes and there by decluttering these classes.
It also provides a rich and easy to integrate API and components, using which we can write more complex and efficient validation logic targetting a single property or a set of properties in a class. It also supports Dependency Injection, for injecting validators or other components within the validators that have a nested relationship.

Found this article helpful? Please consider supporting!
In this brief Quickstart, we’d seen how we can integrate and implement Fluent validations in our ASP.NET Core (.NET 5) MVC application quickly with minimal effort with a demonstrable example. We’d look at more complex scenarios in our next articles. The project source code is available here
ContainerNinja.CleanArchitecture is a simple boilerplate solution built with best practices in mind and supports Fluent Validation and many more. Please do check it out and leave a star ⭐ if you find the solution useful.

