Role based resource access is an interesting yet important concept and best practice employed in Cloud based applications. Popular Cloud providers emphasize on the practice of giving the cloud functions as minimum access permissions as possible, and let the functions impersonate the access permissions of the user who has invoked the function to access the resources.
In this way, the cloud resources are kept secure and any unwanted or accidental access to resources can be avoided.
In this article, let’s look at how we can design an application which employs this concept of role-based resource access, deployed and running in AWS Cloud.
We’ll touch upon the important aspects and how we need to design our resource access policies for the users and how we let our application deployed in AWS get hold of the accessing user permissions and impersonate them for accessing the resources. This is going to be a long and interesting ride, let’s get into business.
Requirement – Control User Access
Let’s assume we’re building an application, with the following usecases:
- Two kinds of users exist – Editors and Admins.
- Editors can create content and save to a datastore – Dynamo DB.
- Editors can also upload assets required for their content. The assets are uploaded to an S3 bucket, while the content is saved as a Key Value document inside a Dynamo DB table.
- Admins can create logins for these Editors, apart from also having access to the resources which the Editors have.
- Both the Editors and Admins are authenticated by JWT tokens, which a Cognito User Pool issues for a logged in user.
From the above context, we can understand that the following AWS resources are in the picture:
- S3 Bucket
- Dynamo DB table
- Cognito User Pool
*We need to ensure that when a particular user invokes an API in our application, the API must allow/deny access to the above mentioned resources based on what kind of user that has made the request. The API gets the user information via the Cognito issued JWT tokens, which somehow should also indicate what the user is: an Editor or an Admin.
Creating IAM Policies
If you are familiar with how AWS works, you already know that access permissions on AWS work based on IAM (Identity Access Management) Policies and Roles.
Policies are documents which describe what resources can be accessed and how these resources can be accessed. A group of Policies constitute an IAM Role, which are used by the AWS resources to validate access.
In our case, we need two Policies to describe the accesses for Editors and Admins. Why just two? Because we can observe that “an Admin is also an Editor, who can also create another Editor”. So we can just two policies – which describes what an Editor does, and what an Admin additionally does. Since IAM Roles constitute more than one Policy, the Admin role would constitute both the Policies, while the Editor role would have only one Policy.
The IAM policy for an Editor (with S3 Bucket and Dynamo DB access) looks like below. The policy just describes what are all permitted on the S3 Bucket and Dynamo DB table for anything that uses this policy. Lets call this policy as rbac-users-resource-access-policy.
{
    "Version": "2012-10-17",
    "Statement": [
        {
            "Sid": "ListObjectsInBucket",
            "Effect": "Allow",
            "Action": [
                "s3:ListBucket"
            ],
            "Resource": [
                "arn:aws:s3:::rbac.demo"
            ]
        },
        {
            "Sid": "AllObjectActions",
            "Effect": "Allow",
            "Action": "s3:*Object",
            "Resource": [
                "arn:aws:s3:::rbac.demo/assets/*"
            ]
        },
        {
            "Sid": "ListAndDescribe",
            "Effect": "Allow",
            "Action": [
                "dynamodb:List*",
                "dynamodb:DescribeReservedCapacity*",
                "dynamodb:DescribeLimits",
                "dynamodb:DescribeTimeToLive"
            ],
            "Resource": "*"
        },
        {
            "Sid": "SpecificTable",
            "Effect": "Allow",
            "Action": [
                "dynamodb:BatchGet*",
                "dynamodb:DescribeStream",
                "dynamodb:DescribeTable",
                "dynamodb:Get*",
                "dynamodb:Query",
                "dynamodb:Scan",
                "dynamodb:BatchWrite*",
                "dynamodb:CreateTable",
                "dynamodb:Delete*",
                "dynamodb:Update*",
                "dynamodb:PutItem"
            ],
            "Resource": "arn:aws:dynamodb:*:*:table/rbac.demo"
        }
    ]
}
The Admin policy is all about the ability to create new users, which obviously should mean Cognito since that’s the identity provider for all the users in our application. Let’s call this policy as rbac-users-cognito-admin-policy. The policy contains the UserPoolId of the Cognito, which we’re going to create in the next step.
{
    "Version": "2012-10-17",
    "Statement": [
        {
            "Sid": "AdminCreateCognitoUser",
            "Effect": "Allow",
            "Action": [
                "cognito-idp:AdminCreateUser",
                "cognito-idp:AdminAddUserToGroup"
            ],
            "Resource": [
                "arn:aws:cognito-idp:*:*:userpool/MyCoGnItO_UsErPoOl_Id"
            ]
        }
    ]
}
Creating the Roles
In the first step, we create two Roles which represent the Admin and Editor user permissions respectively:
- Let the role name for the Editor be rbac-users-editor-role. As mentioned above, this Role constitutes the policy rbac-users-resource-access-policy.
- The role name for the Admin be rbac-users-admin-role. This Role constitutes both the policies rbac-users-resource-access-policy and rbac-users-cognito-admin-policy.
We now have our Roles ready – one for Editor which can allow access to a particular S3 Bucket and Dynamo DB table only, and the other is for the Admin who can create new Cognito user apart from accessing the S3 Bucket and Dynamo DB table.
Since we’re dealing with Cognito, let’s create a User Pool for the users. We’ve already looked at how we can create a Cognito User Pool and creating App Clients for authentication via JWT tokens – we’re going to do just the same here.
Once we’re done with the Cognito, we need to do one additional step – create Groups.
Creating the Cognito Groups
Cognito Groups are logical separation of Users within a Cognito User Pool. Each Group consists of a Role which we might want the user be assigned with. When that particular user from the group signs into Cognito, AWS also adds the Roles tagged to the Groups to which the user is a part of. All the roles which the user inherits for being parts of Cognito Groups come under a key “cognito:groups” within the JWT token claims.
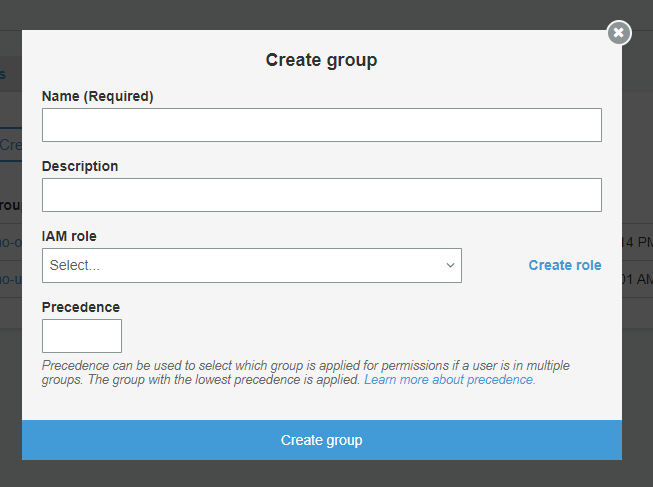
To create a Group, navigate to the Cognito User Pool and click on the “Users and Groups” section under “General Settings”. Then click on the “Groups” tab next to the “Users” tab and click the “Create Group” button. You need to specify the “Group Name”, “Role” and a “Precedence” on a scale of 1 to 5 – with 1 being the highest.
In our cognito, we’ll create two Groups: rbac-admins-group which consists of users who are assigned to be Admins, and rbac-editors-group which consists of users who are assigned to be Editors.
We’ll assign the role rbac-users-admin-role to the group rbac-admin-group and the role rbac-users-editor-role to the group rbac-editors-group.
This way, we’ll make sure that all editors who’d be created by the Admins fall under the group rbac-editors-group and when they login, their idToken would contain the role rbac-users-editor-role in its claims.
The claims would somewhat look like below:
{
  "at_hash": "xx-xxxxxxxxxxxxxx",
  "sub": xxxx-xxxx-xxxx-xxxx-xxxx-xxxx-xxxx",
  "cognito:groups": [
    "rbac-editors-group"
  ],
  "cognito:preferred_role": "arn:aws:iam::123456789:role/rbac-users-editor-role",
  "iss": "https://cognito-idp.us-west-2.amazonaws.com/MyCoGnItO_UsErPoOl_Id",
  "cognito:username": xxxx-xxxx-xxxx-xxxx-xxxx-xxxx-xxxx",
  "cognito:roles": [
    "arn:aws:iam::123456789:role/rbac-users-editor-role"
  ],
  "aud": "abcdefghijklmnopqrstuvwxyz",
  "event_id": "xxxx-xxxx-xxxx-xxxx-xxxx-xxxx-xxxx",
  "token_use": "id",
  "auth_time": 1610904845,
  "exp": 1610908445,
  "iat": 1610904845,
  "email": "editor@yopmail.com"
}
Whereas for an Admin who’d be there in the group rbac-admins-group would contain the role rbac-users-admin-role whose claims would look like below:
{
  "at_hash": "xx-xxxxxxxxxxxxxx",
  "sub": xxxx-xxxx-xxxx-xxxx-xxxx-xxxx-xxxx",
  "cognito:groups": [
    "rbac-admins-group"
  ],
  "cognito:preferred_role": "arn:aws:iam::123456789:role/rbac-users-admin-role",
  "iss": "https://cognito-idp.us-west-2.amazonaws.com/MyCoGnItO_UsErPoOl_Id",
  "cognito:username": xxxx-xxxx-xxxx-xxxx-xxxx-xxxx-xxxx",
  "cognito:roles": [
    "arn:aws:iam::123456789:role/rbac-users-admin-role"
  ],
  "aud": "abcdefghijklmnopqrstuvwxyz",
  "event_id": "xxxx-xxxx-xxxx-xxxx-xxxx-xxxx-xxxx",
  "token_use": "id",
  "auth_time": 1610904845,
  "exp": 1610908445,
  "iat": 1610904845,
  "email": "admin@yopmail.com"
}
We now have our Roles ready, User Pool ready and the Groups ready. Let’s now move on to the next component, which bridges the gap between the user identities and the AWS resources.

Found this article helpful? Please consider supporting!
Let’s understand what is an Identity Pool and why do we need it in our cause. We shall also look into how all these pieces fall into place to form one end-to-end robust access control mechanism – all in the next article.
Read How we got started with Role based Access with AWS Here – Role based Access Control in AWS
Read How we create Identity Pools and configure for resource access Here – Integrate Identity Pools

