Introduction
Imagine you’re creating a mobile application for an existing web application with a few extended features and experiences. You may prefer developing everything from the scratch because there may be little that can be reused from a web application in a mobile application (we’re not talking about Hybrid apps – they’re all together a different story).
However, there can be a few components in a web application which you may not want to recreate for a mobile view and instead reuse them – static content such as about, contact and help pages etc.
A better solution for such components would be to load these web pages inside a mobile view so that all the HTML content would be wrapped into the mobile and a single source of content (probably at the web app end) would serve to both web and mobile counterparts. To implement this kind of a mechanism, we make use of Web Views.
What is a Web View?
A Web View is a mobile component where a HTML content from an external source (or an internal source) is rendered over a browser embedded inside a mobile view. Web View also provides us control over the web page lifecycle by means of event delegates.
We can make use of these events for a variety of purposes – such as examining parts of URL, controlling redirects and so on.
In Flutter, we can accommodate Web Views in our application code by means of the “webview_flutter” package. We can install this package in our flutter application and wire up a WebView which can be added to our Widget tree like as any other built-in widgets and access it according to our requirements.
How to implement a Web View in Flutter
To illustrate this, let’s take the example of our Blogging application we have created in our getting started series of articles. It is a simple two-page application with a landing ListView of blog items and on click of any ListItem tile takes us to another page which shows up the entire blog article we clicked before.
For this ListTile, let’s say we’re now interested in showing user the actual article from the Blog website instead of rendering it in a native flutter page.
To do this, we can use the webview_flutter package to create a WebView and pass our blog web url to it, which then fetches data over the internet and renders it onto an embedded browser view.
To get started, create a new flutter app by using the below command:
> flutter create web_view_appOpen the project in any editor; I personally recommend using Visual Studio Code which is my favorite for working with Flutter. Inside the project, open the pubspec.yaml file and add the webview_flutter package, and also the http package which we shall use to GET list of blog items from the blog web API.
dependencies:
flutter:
sdk: flutter

http: ^0.12.0+4
webview_flutter: ^0.3.22+1
On iOS the WebView widget is backed by a WKWebView; On Android the WebView widget is backed by a WebView.
Once the file is saved, we can see that VS Code tries to restore the packages. If not, we can restore the packages manually with the below command –
> flutter pub getNote: To use webview_flutter inside our flutter application, we would also need to add the below attribute in case of Android to the AndroidManifest.xml file.
# AndroidManifest.xml

android:usesCleartextTraffic="true"
otherwise we might get the “net::err_cleartext_not_permitted” error when loading content in WebView.
In iOS, Opt-in to the embedded views preview by adding a boolean property to the app’s Info.plist file with the key io.flutter.embedded_views_preview and the value YES.
Now that we have both the libraries available for us to play, let’s begin by adding our post_service.dart which encapsulates logic for working with HTTP requests. I’d add this file under /lib/services for better structuring.
class PostService {
  Future<List<Item>> getPosts() async {
    var url = '${Config.baseUri}/api/posts';
    try {
      final res = await http.get(url);
      if (res.statusCode == 200) {
        var content = res.body;
        var arr = json.decode(content) as List;
        // for every element of arr map to _fromJson
        // and convert the array to list
        return arr.map((e) => _fromJson(e)).toList();
      }
    } catch (err) {
      print(err);
    } finally {}
    return List<Item>();
  }

  Future<Item> getSingle(String slug) async {
    var url = '${Config.baseUri}/api/posts/$slug';
    try {
      final res = await http.get(url);
      if (res.statusCode == 200) {
        var content = res.body;
        var e = json.decode(content) as Map<String, dynamic>;
        return _fromJson(e);
      }
    } catch (err) {
      print(err);
    } finally {}
    return Item();
  }

  Item _fromJson(Map<String, dynamic> item) {
    return new Item(
        content: item['content'],
        description: item['description'],
        title: item['title'],
        cover: "${Config.baseUri}/${item['cover']}",
        slug: "${item['slug']}");
  }
}
The post_service.getPosts() method fetches json data from the blog API, whose base URI we maintain in a constants file under /lib/constants/config.dart
Once the API returns the JSON data, it is transformed into a list of Item objects that contains the deserialized blog item. The class looks like below –
class Item {
  String cover;
  String title;
  String content;
  String description;
  String slug;

  Item({this.slug, this.title, this.content, this.description, this.cover});
}
This data is bound to a ListView inside the ItemListPage by means of a FutureBuilder.
class ItemListPage extends StatelessWidget {
  final String title;
  ItemListPage({this.title});

  final items = PostService().getPosts();

  @override
  Widget build(BuildContext context) {
    return Scaffold(
        appBar: AppBar(
          title: Text(title),
        ),
        body: ItemListWidget(
          items: items,
        ));
  }
}

class ItemListWidget extends StatelessWidget {
  final Future<List<Item>> items;

  ItemListWidget({this.items});

  @override
  Widget build(BuildContext context) {
    return FutureBuilder(
      future: items,
      builder: (context, snapshot) {
        // operation for completed state
        if (snapshot.hasData) {
          return ListView.builder(
              itemCount: snapshot.data.length,
              itemBuilder: (context, index) {
                var item = snapshot.data[index];
                return ItemTile(item);
              });
        }
        // spinner for uncompleted state
        return SpinnerWidget();
      },
    );
  }
}
The ItemTile renders an individual blog item on tap of which we should be redirected to a new page.
class ItemTile extends StatelessWidget {
  final Item item;
  ItemTile(this.item);

  @override
  Widget build(BuildContext context) {
    return _columnTile(context, item);
  }

  Widget _columnTile(BuildContext context, Item item) {
    return InkWell(
        onTap: () {
          // open the page that renders a WebView
          Navigator.push(context,
              MaterialPageRoute(builder: (context) => ItemWebViewPage(item)));
        },
        child: _columnTileContainer(item));
  }

  ...
}
This new page is where we embed a WebView to render the tapped item’s content over the web.
class ItemWebViewPage extends StatelessWidget {
  final Completer<WebViewController> _controller =
      Completer<WebViewController>();

  final article;
  ItemWebViewPage(this.article);

  Widget build(BuildContext context) {
    return Scaffold(
        appBar: AppBar(
          title: Text(this.article.title),
        ),
        body: WebView(
            initialUrl: '${Config.baseUri}/blog/posts/${this.article.slug}',
            javascriptMode: JavascriptMode.unrestricted,
            onWebViewCreated: (WebViewController webViewController) {
              _controller.complete(webViewController);
            }));
  }
}
Observe the build() method inside the ItemWebViewPage which is called whenever user taps on an ItemTile. We scaffold a WebView() widget inside the body property, along with params initialUrl, javascriptMode and an event callback onWebViewCreated.
initialUrl – The Url that is loaded when the WebView is rendered on the page.
javascriptMode – defines how we want the javascript inside the rendered webview to behave. The possible options are “unrestricted” means javascript execution is not blocked and “disabled” which restricts javascript execution on the page.
onWebViewCreated – a callback which is triggered once the WebView finishes loading the webpage inside the WebView. The callback passes a WebViewController object which we can use to control the webpage. In this context, we call complete() function on a Completer along with the instance of webViewController that the callback provides.
The output looks like below –
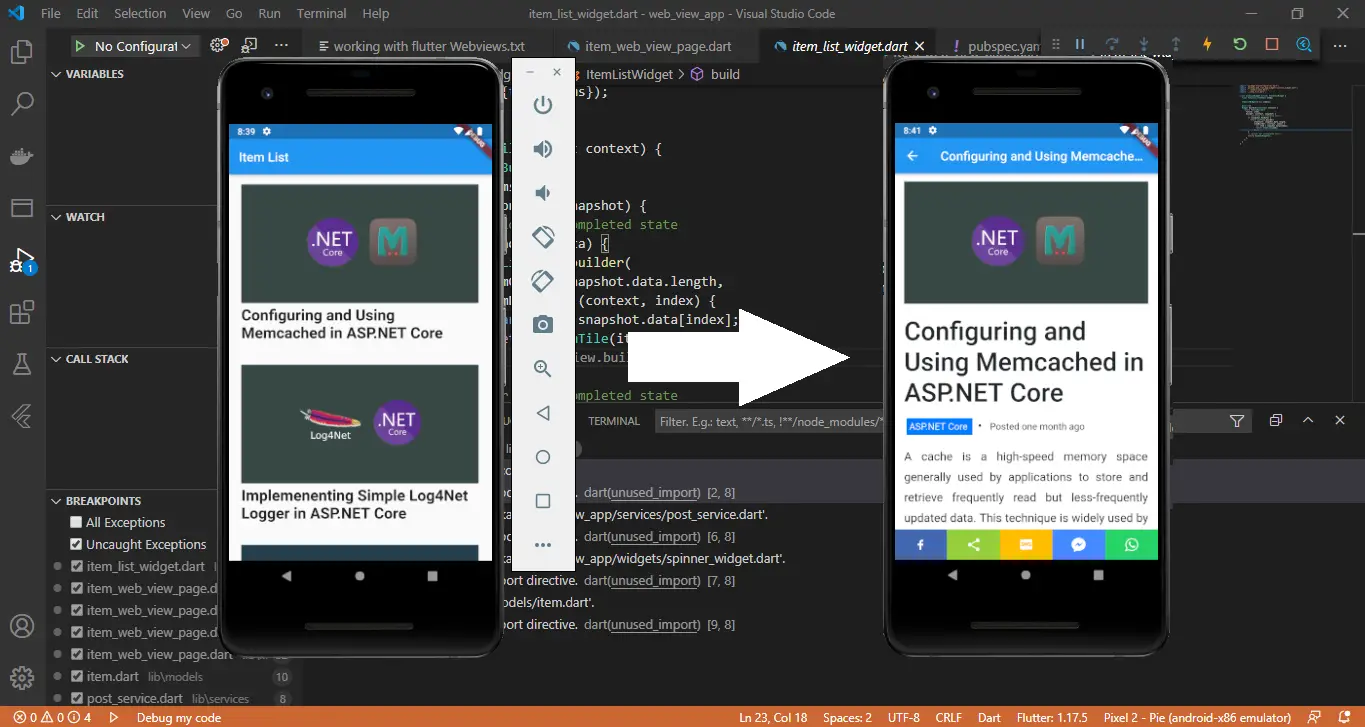
How to render HTML content on Flutter Web View
In the previous scenario, we saw that once we provide the url to load in the WebView, it automatically renders the entire HTML content available from the provided url on the webview including associated stylesheets and scripts.
Let’s say our requirement now changes like this: whenever user taps on a tile, the app should request for content from another API which returns HTML content for the selected item and the WebView should now render the HTML content from this API.
To implement this, we can make use of a FutureBuilder which can help us in loading content asynchronously.
@override
Widget build(BuildContext context) {
return Scaffold(
appBar: AppBar(
title: Text(this.article.title),
),
body: FutureBuilder(
// render content via the builder
builder: (context, snapshot) {
// render content if data is available
if (snapshot.hasData) {
var data = snapshot.data as Item;
// render a webview on the body
return WebView(
// initialUrl should always be given, can't be omitted
initialUrl: '${Config.baseUri}/blog/posts/${data.slug}',
javascriptMode: JavascriptMode.unrestricted,
onWebViewCreated:
(WebViewController webViewController) async {
// the callback triggers once the load is complete
// data.content contains the HTML content
// convert the HTML content into a Base64 content
final String contentBase64 =
base64Encode(const Utf8Encoder().convert(data.content));
// load the Base64 converted content into the WebView
// using the webViewController provided in the callback
await webViewController
.loadUrl('data:text/html;base64,$contentBase64');
// finally signal a complete() to the completer
_controller.complete(webViewController);
});
}
// show a spinner until the data is available
return SpinnerWidget();
},
// source of data for the builder
future: PostService().getSingle(this.article.slug),
)
);
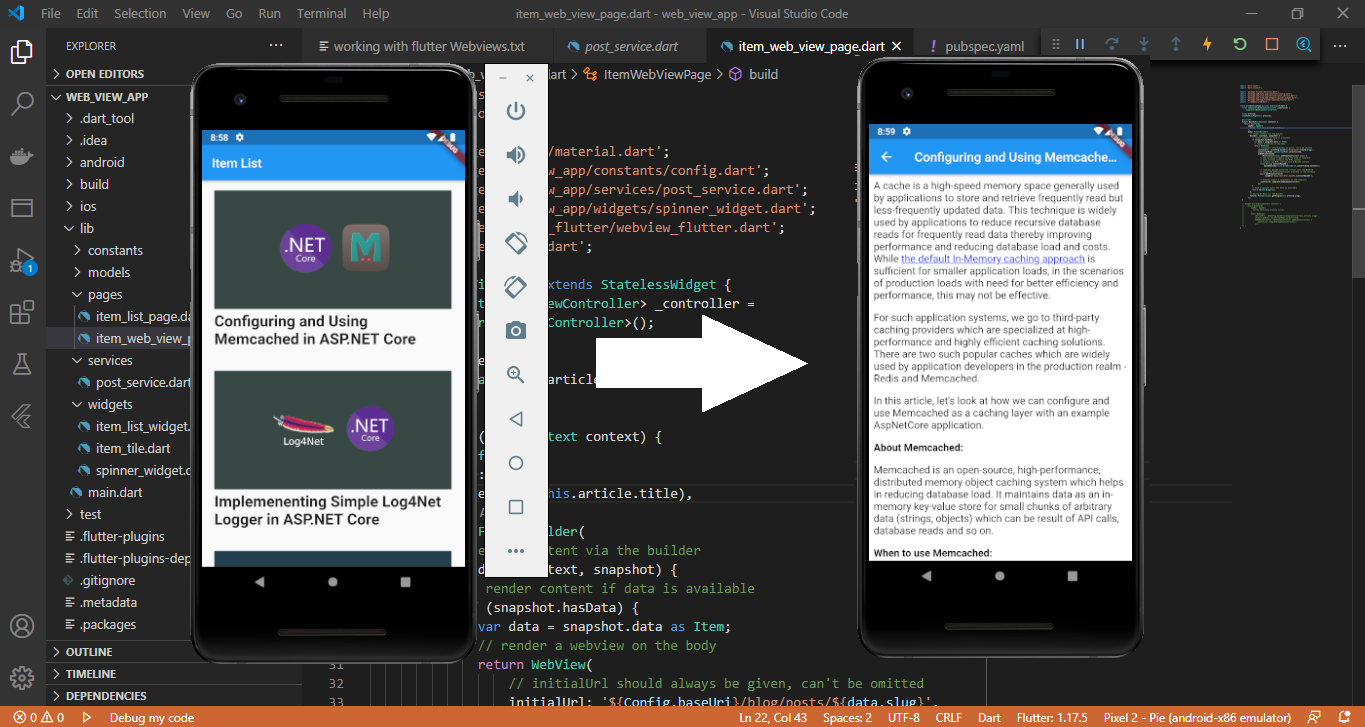
}The FutureBuilder requests data from the PostService().getSingle() method which asynchronously returns a single Item object. The Builder then renders the returned content in Base64 format into the WebView widget inside the onWebViewCreated callback.
The output now looks like below –
How to control Navigation in a Web View
When working with a webview, we would also be interested in controlling how a user navigates within the web context inside the webview. We might want to control how the webview should behave when the user clicks on some link inside the view which might redirect the user to another web page.
To control this behaviour, we can make use of another callback provided with the WebView – navigationDelegate. navigationDelegate provides us with options to make decisions about user navigation within a WebView.
return WebView(
    // initialUrl should always be given, can't be omitted
    initialUrl: '${Config.baseUri}/blog/posts/$slug',
    javascriptMode: JavascriptMode.unrestricted,
    onWebViewCreated: (WebViewController webViewController) async {
        // finally signal a complete() to the completer
        _controller.complete(webViewController);
    },
    navigationDelegate: (NavigationRequest request) {
        if (request.url.contains("about")) {
            return NavigationDecision.prevent;
        }
        return NavigationDecision.navigate;
    },
    gestureNavigationEnabled: true,
);
navigationDelegate expects a return type of NavigationDecision – which gives us option to either “prevent” navigation or “allow” users to navigate to the clicked link inside the WebView.
For example, in our WebView we can add a condition in our navigationDelegate to see if the request url which the webview is about to redirect to contains a string “about” or not. If the url contains “about” we prevent the navigation that otherwise redirects to the about url.
One best usecase for using a navigationDelegate is signing in users by means of redirection where the user clicks on a button to redirect to a Login page and once authenticated the user is redirected back to a landing page and inside the navigationDelegate we identify this navigation and pick the authCode or token values in the URL fragments.
Conclusion
In this way, we can implement WebView features in our flutter application using the webview_flutter widget and use it for a variety of usecases.
The complete example used in this article is available at https://github.com/referbruv/flutter-webview-example
How do you plan to use the webview_flutter package in your application? Do let me know in the comments below!

