So far we have been discussing several authentication flows for various scenarios where a system or a user exchanges some security information for access token with IdentityServer4 Token Server in order to access a secure endpoint or a resource whose access is controlled by the Token Server.
We have seen the Client_Credentials grant where a system exchanges its secure credentials, namely clientId and clientSecret in exchange for an access token for accessing a resource. We have also looked at the ROPC (Resource Owner Password Credentials) flow via the Password grant where the interaction between two backend systems can be protected using a fixed set of username and password.
In this article, let’s look at one of the most commonly used OAuth flow which involves a user interaction with the Authorization Server for accessing a resource. This is called as the Authorization Code flow, provided by the Authorization Code grant type.
What is an Authorization Code Flow?
Authorization Code flow involves a two-step process, where the user validates himself against the authorization server by providing his own identity credentials. The Authorization Server validates the user credentials and provides with an Authorization Code.
An Authorization Code is a temporary code generated by the Authorization Server representing the authenticated user, which the client exchanges for a token.
This flow is most suitable for applications where a user interaction or a role is involved, because the user gets to see what the client application is requesting the authorization server on behalf of the user and can approve or deny the information access to the client based on it.
Some common real-world examples for this flow are the Social Logins provided by providers such as Facebook, Google or GitHub which when we use in any third-party websites such as Reddit, Quora and so on would undergo this flow to provide these third-party websites requested user access.
The Authorization Flow
The prerequisite of this flow is that the client application must register itself in the Token Server to obtain a clientId and a clientSecret which it needs to pass during the token exchange requests.
As mentioned above, the authorization_code flow happens in the following steps:
- The client application prepares an /authorize endpoint request with mandatory parameters such as client_id, grant_type, response_type and redirect_uri and makes a GET request to the IdentityServer (via a browser).
- The server when received the request examines the client_id, grant_type and the redirect_uri, and validates for matching client records in its data store.
- If a matching client is available, which means that this request is being made by a genuine client which is already registered to use the Token server with this grant and then redirects to its own Login page, where it requests the user to enter his account credentials if already exist or create a new account.
- Once user credentials are validated, the Token Server redirects to the redirect_uri registered with the client and attaches a temporary code with a “code” query parameter.
- The client extracts this code received from the Token Server and then prepares a POST request to the /token endpoint to exchange this token for an access (or identity) token that enables it to impersonate the user identity. It passes the client_id, code and the redirect_uri to the server along with a security header passing its clientSecret.
- The Token Server receives this POST request, examines the header to validate the client and then validates the code sent in the request body to check if there was any code against this client which was generated previously. If validated, the Token Server returns the access (and or id) tokens to the client.
Authorization Code Flow and IdentityServer4
Since all the auth flows we’ve implemented with IdentityServer4 didn’t require a user interaction for credentials, we didn’t get a need to implement login or signup pages in our token server. But for authorization_code grant, we need to add login pages for the user to enter credentials in our token server.
IdentityServer4 comes with another template which provides only the Views and Controllers required to do this. We shall use this template to fetch the Controllers and Views required and then add them into our token server to accommodate the Login functionality.
Let’s start by running:
> dotnet new is4ui
Which produces three folders Quickstart (Controllers), Views and wwwroot (asset or script items). Move these folders into our STS project and inside the Startup.cs file, uncomment the lines which add the MVC functionality to it.
The Startup class now looks like this:
using Microsoft.AspNetCore.Builder;
using Microsoft.AspNetCore.Hosting;
using Microsoft.Extensions.DependencyInjection;
using Microsoft.Extensions.Hosting;

namespace ids4.simple
{
    public class Startup
    {
        public IWebHostEnvironment Environment { get; }

        public Startup(IWebHostEnvironment environment)
        {
            Environment = environment;
        }

        public void ConfigureServices(IServiceCollection services)
        {
            // uncomment, if you want to add an MVC-based UI
            services.AddControllersWithViews();

            var builder = services.AddIdentityServer(options =>
            {
                options.EmitStaticAudienceClaim = true;
            })
                .AddInMemoryIdentityResources(Config.IdentityResources)
                .AddInMemoryApiScopes(Config.ApiScopes)
                .AddInMemoryClients(Config.Clients)
                .AddTestUsers(Config.Users);

            // not recommended for production
            // you need to store your key
            // material somewhere secure
            builder.AddDeveloperSigningCredential();
        }

        public void Configure(IApplicationBuilder app)
        {
            if (Environment.IsDevelopment())
            {
                app.UseDeveloperExceptionPage();
            }

            // uncomment if you want to add MVC
            app.UseStaticFiles();
            app.UseRouting();

            app.UseIdentityServer();

            // uncomment, if you want to add MVC
            app.UseAuthorization();
            app.UseEndpoints(endpoints =>
            {
               endpoints.MapDefaultControllerRoute();
            });
        }
    }
}
Observe that we’re using InMemory data for populating our Token Server with Client, ApiScopes and even User data.
var builder = services.AddIdentityServer(options =>
{
    options.EmitStaticAudienceClaim = true;
})
.AddInMemoryIdentityResources(Config.IdentityResources)
.AddInMemoryApiScopes(Config.ApiScopes)
.AddInMemoryClients(Config.Clients)
.AddTestUsers(Config.Users);
where in real-world we should connect to an actual data store such as a database for storing this data. We shall look in detail about this in another article. For now, we configured our TokenServer with data populated from a static class Config which we have been using so far. Added to the band is a new Client which now is configured to use Authorization Code grant and Config.Users list which contains a single static user data as below:
publicstaticIEnumerable<Client>Clients=>
    newClient[]
    {
        new Client
        {
            ClientId="client",
            AllowedGrantTypes=GrantTypes.ClientCredentials,
            ClientSecrets=
            {
                newSecret("secret".Sha256())
            },
            AllowedScopes={"api1"}
        },
    new Client
    {
        ClientId="pkce_client",
        ClientSecrets={new Secret("secret".Sha256())},
        AllowedGrantTypes=GrantTypes.Code,
        RedirectUris={"https://localhost:5002/signin-oidc"},
        PostLogoutRedirectUris={"https://localhost:5002/signout-callback-oidc"},
        AllowedScopes=new List<string>
        {
            "openid",
            "profile",
            "api1"
        }
    }
};
public static List<TestUser> Users => new List<TestUser> {
    new TestUser
    {
        Username = "alice",
        Claims = new Claim[] {
            new Claim(JwtClaimTypes.Name, "Alice Smith"),
            new Claim(JwtClaimTypes.GivenName, "Alice"),
            new Claim(JwtClaimTypes.FamilyName, "Smith"),
            new Claim(JwtClaimTypes.WebSite, "http://alice.com"),
            new Claim(JwtClaimTypes.Email, "AliceSmith@email.com")
        },
        Password = "Abcd@1234",
        IsActive = true,
        SubjectId = Guid.NewGuid().ToString(),
    }
};
Observe that in the Authorization Code client we’ve now added, we have the RedirectUris which point to a set of client URLs which are the only permitted urls where the authorization_code is sent on user validation. AllowedGrantTypes is set to GrantTypes.Code which represents this flow. Only a client request which contains this client_id, grant_type and redirect_uri is allowed for this flow.
Fetching Tokens
As mentioned before, the client first makes a GET request to the TokenServer asking for Authorization Code. The URL is constructed like this:
GET https://localhost:5001/connect/authorize?
client_id=pkce_client&
grant_type=authorization_code&
response_type=code&
redirect_uri=https://localhost:5002/signin-oidc&
scope=openid+profile+api1&
code_challenge_method=S256&
code_challenge=1Kht0Wkyt_WvDngoM_AIOYPPOWG8lzVG1g1zk28TjSo
response_type indicates what the client is expecting from the Token Server to provide with, in this case it is code since the client is expecting authorization_code for the Token Server to send.
scope represents the different levels of access the client is requesting from the Token Server against a resource. Here we’re passing in the openid which means that the client is asking for an identity token along with an access token, profile to access user information and profile data, api1 is to access an ApiResource which requires this scope to be able to access it. We’ve seen this in the Client_Credentials flow.
Code Challenge and PKCE
PKCE stands for Proof Key for Code Exchange. code_challenge_method and code_challenge are used if the Token Server supports PKCE. It is an extension to authorization_code flow to prevent injection attacks and mitigate other security risks involved when the client is requesting for code from the Token Server.
Why PKCE?
When the client is making a GET request to the server for Authorization Code, there is a possibility for someone to intercept this authorization_code and play with it, leaking out the user information.
To prevent this, the client passes an encrypted string to the server with the code_challenge parameter, along with code_challenge_method parameter which describes how this string was formed. There are only two methods prescribed: plain and S256, the latter being the most commonly used PKCE means.
The encrypted string is formed by Base64 Encoding a SHA256 hashed random string within the client, which also takes a note of this string it used to generate the code_challenge. This string is called a code_verifier. You can also generate these strings using a PKCE Generator Tool online.
Starting from IdentityServer4 4.0.0, the AuthorizationCode flow now requires the clients to pass a codechallenge string in their code requests.
Once the server receives this GET request, it redirects to the /account/login page, which is available inside the Quickstart folder we now added.
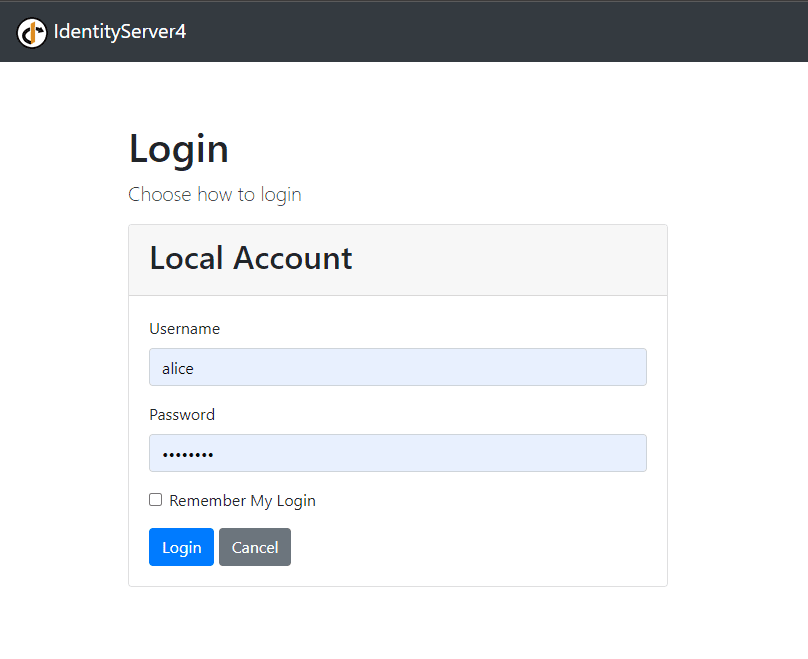
Here we give our populated credentials, which should be successfully validated by the IdentityServer. The server now redirects to the redirect_uri we passed in our request.
https://localhost:5002/signin-oidc?
code=66C994090CA6DE4AA117821FA391995211ACF4C24DC835BEE0FC4F7913A17DB8&
scope=openid%20profile%20api1&
session_state=gxNmiFqYsmfCtTnLX5x1lnfx6MArstJ07lOBNkT_4Ho.D507ED4ADD8F40D0D6C4691FB87CEAF9
The code is the authorization_code to be picked by the client to exchange for the tokens. The client now makes a POST request with this code it obtained, as below:
POST /connect/token HTTP/1.1
Authorization: Basic cGtjZV9jbGllbnQ6c2VjcmV0
Content-Type: application/x-www-form-urlencoded

grant_type=authorization_code&
code_verifier=code_verifier_is_too_short_to_use_i_dont_know_what_to_do_for_this&code=66C994090CA6DE4AA117821FA391995211ACF4C24DC835BEE0FC4F7913A17DB8&
client_id=pkce_client&
redirect_uri=https://localhost:5002/signin-oidc
We’re passing an Authorization header with Basic Base64(clientId:clientSecret). Here it is Base64(pkce_client:secret) which results in that value. The ContentType is x-www-form-urlencoded, with the form data containing:
grant_type is the flow we’re trying here, which is authorization_code – similar to what we passed in our GET request in step 1.
code_verifier is the actual string which the client used to generate the PKCE code_challenge.
code is the authorization_code received from step 1, passed in as here.
client_id is the registered client_id in the token server which is same as the one passed in the GET request and also in the Request Header.
redirect_uri is the redirect_uri configured in the Token Server and also which is used in the GET request in step 1.
The response for this request is as below:
{
    "id_token": "##########",
    "access_token": "##########",
    "expires_in": 3600,
    "token_type": "Bearer",
    "scope": "openid profile api1"
}
Acessing the User Info
We can now use this access_token thus obtained to fetch user profile information by calling the UserInfoEndpoint in the IdentityServer4 server as:
GET /connect/userinfo HTTP/1.1
Authorization: Bearer MY_ACCESS_TOKEN_THUS_OBTAINED
which returns:
{
    "name": "Alice Smith",
    "given_name": "Alice",
    "family_name": "Smith",
    "website": "http://alice.com",
    "sub": "75b6279e-e665-4a8f-b96d-d5e0ef706ce9"
}
Configuring ASP.NET Core Client
When working with ASP.NET Core Authorization Middleware in server side applications such as MVC clients, we can skip all these steps because the middleware takes care of these steps for us in providing the Authentication Context.
The middleware is configured as below:
services.AddAuthentication(options =>
{
    options.DefaultScheme = "Cookies";
    options.DefaultChallengeScheme = "oidc";
})
.AddCookie("Cookies")
.AddOpenIdConnect("oidc", options =>
{
    options.Authority = "https://localhost:5001";
    options.ClientId = "pkce_client";
    options.ClientSecret = "secret";
    options.ResponseType = "code";
    options.UsePkce = true;
    options.SaveTokens = true;

    options.Scope.Add("openid");
    options.Scope.Add("profile");
    options.Scope.Add("api1");
});
The boolean flag UsePkce indicates that the server supports PKCE and the client needs to add the code_challenge and code_verifier identifiers in the request for PKCE security.
This middleware now does the redirection to IdentityServer4 for authentication and on return sets up the Authentication context for the user identity which is now available under HttpContext.User property for the request.

Found this article helpful? Please consider supporting!
Conclusion
We can implement our Authorization Code flow for Interactive applications where a User directly interacts with the Token Server to authenticate and authorize a client for resource access.
This flow is further strengthened by PKCE aka Proof Key for Code Exchange, which adds another layer of security by means of code_challenge and code_verifier concept.
Boilerplate
Here is a simple boilerplate token server based on IdentityServer4, ideal for getting started with token based authentications – https://github.com/referbruv/simple-sts
A Minimalistic TokenServer based on the IdentityServer4 framework. Contains assembled and customized logic for Clients, ApiResources, ApiScopes and UserStore with integration to SQL Server database. Works based on the OAuth standards and can work as a boilerplate code for developers looking to setup a minimalistic TokenServer for development or staging environments.
– https://github.com/referbruv/simple-sts

