This is the ninth article in the "Flutter for Beginners" where in we are looking at how to get started with developing mobile applications in the world of flutter. By the end of this series, we shall try to make a simple blog app with a home list of articles with a navigation to each individual article. So far we have seen how to setup the environment, create a sample project to get started and then also analysed the various files and folders that reside under a flutter project and their individual purposes on the whole. And we have a gone a step ahead and created a scrollable view of an article page with an Image, a Title and a long description without having to face issues of display overflow. We have also started on developing our home page list of articles by means of ListView. In this article, let’s customize our ListView a bit more and complete the view by linking our home page with our blog content page by means of tap event and routing.
Read:
Article 1 – Setting Things up and Getting Started
Article 2 – Understanding App Structure and Anatomy
Article 3 – Understanding the main.dart and flow of execution – First run
Article 4 – Understanding Stateful and Stateless Widgets
Article 5 – Creating a Scrollable Content View
Article 6 – Understanding a Scaffold Widget
Article 7 – Working with Container, Rows and Columns
Article 8 – Creating and binding content to a List View
Step 1 – Customizing the ListTiles:
So far we were able to create a List of blog articles showing up in a two row – two column manner: the first column is an image thumbnail rendered from the internet using the Image.network() method and in the second column we have two rows, first row consists of the title and second row shows up a subtitle of the article. So far so good. Now, I would want to instead have a three row – one column layout which we see in most of the blogging websites out there – a single large image thumbnail, with next two rows containing the title and the shorter subtitle or description. The basic ListTile doesn’t support this kind of feature. But we can make use of the nature of the flutter framework to build the view according to our own taste.
If we look at how the ListView.builder() works, it iterates over a given array of contents and renders a "Widget" which in default case is a "ListTile" onto the screen for each content item processed. Emphasizing on the word "widget" here because basically in Flutter everything "is-a" "Widget" and so we can use anything in place of a "ListTile" to render. Of course, this would mean that we would miss out on some of the UI characteristics and features offered by a ListTile, but in our scenario its worth the effort.
So in theory, If we pass in a Column() widget in place of a ListTile for a ListView.builder() it should still work. And this Column() internally enables us to customize our article item UI according to our expectations. Let’s say we have created a Column() layout which is wrapped under a Container() to have the margins and paddings for the tile as below:
Widget _verticalTile(Item item) {
    Container(
      padding: EdgeInsets.fromLTRB(10.0, 5.0, 10.0, 5.0),
      margin: EdgeInsets.all(10.0),
      child: Column(
        crossAxisAlignment: CrossAxisAlignment.stretch,
        mainAxisAlignment: MainAxisAlignment.spaceBetween,
        children: <Widget>[
          _thumbnail(item),
          _title(item.title,
              TextStyle(fontSize: 24.0, fontWeight: FontWeight.bold)),
          _title(item.subtitle, TextStyle(fontSize: 14.0))
        ],
      ),
    );
  }
Now we pass this _columnTile() method into our ListView.builder() renderer for scaffolding this Container() view in place of the default ListTile as below:
return ListView.builder(
        itemCount: items.length,
        itemBuilder: (context, i) {
          var item = items[i];
          return ArticleTile(item);
        });
where ArticleTile() is a StatelessWidget defined as below:
class ArticleTile extends StatelessWidget {
  final Item item;
  ArticleTile(this.item);

  @override
  Widget build(BuildContext context) {
    return _verticalTile(context, item);
  }
}
The thumbnail and title widgets are customized as below:
 Widget _thumbnail(Item item) {
    return Container(
        constraints: BoxConstraints.tightFor(width: 100.0),
        child: Image.network(
          item.url,
          fit: BoxFit.fitHeight,
        ));
  }

  Widget _title(String text, TextStyle style) {
    return Container(
      padding: EdgeInsets.fromLTRB(0, 5.0, 0, 5.0),
      child: Text(
        text,
        style: style,
      ),
    );
  }
Bringing all these things together for a given set of article items gives us the desired view as below:
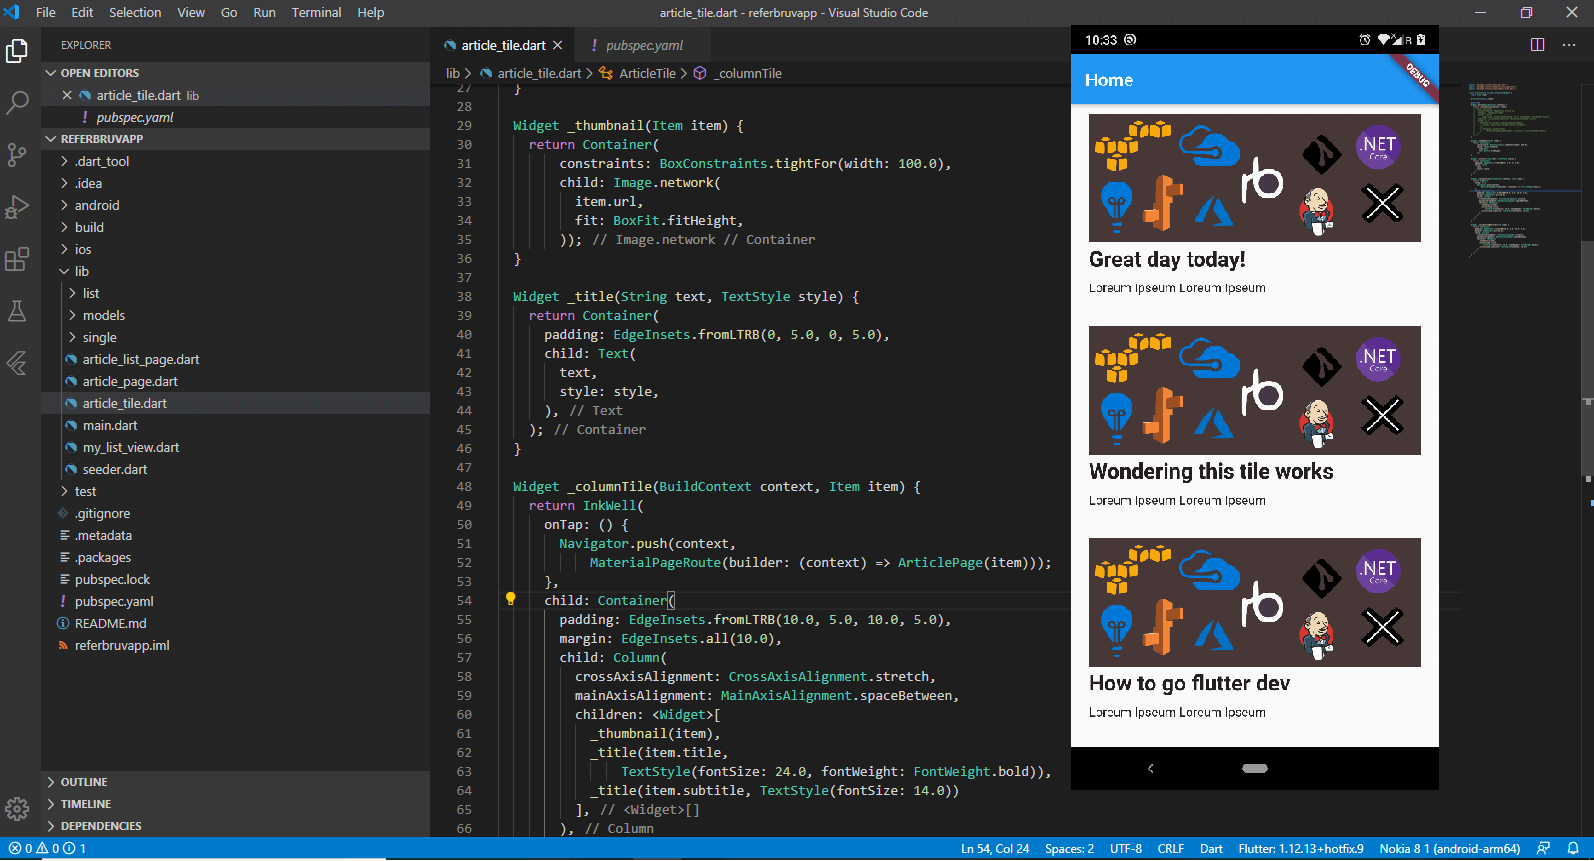
Bingo! We’ve got what we were expecting. So let’s understand what we have done. We return a rendered Widget _verticalTile() within ListView for each article item at the index i. This _verticalTile() method returns a Container() widget within which we are constructing our own three-row Article widget with customized text, thumbnail and a subtitle. All this get iterated and rendered over and over for all items in the array items.
But we are missing out on one thing here: we did have created the list view, but we can’t impose any click feature onto this tile since its just a Container() widget. If it had been the default ListTile() how would we have solved it?
Step 2 – On Tap Event:
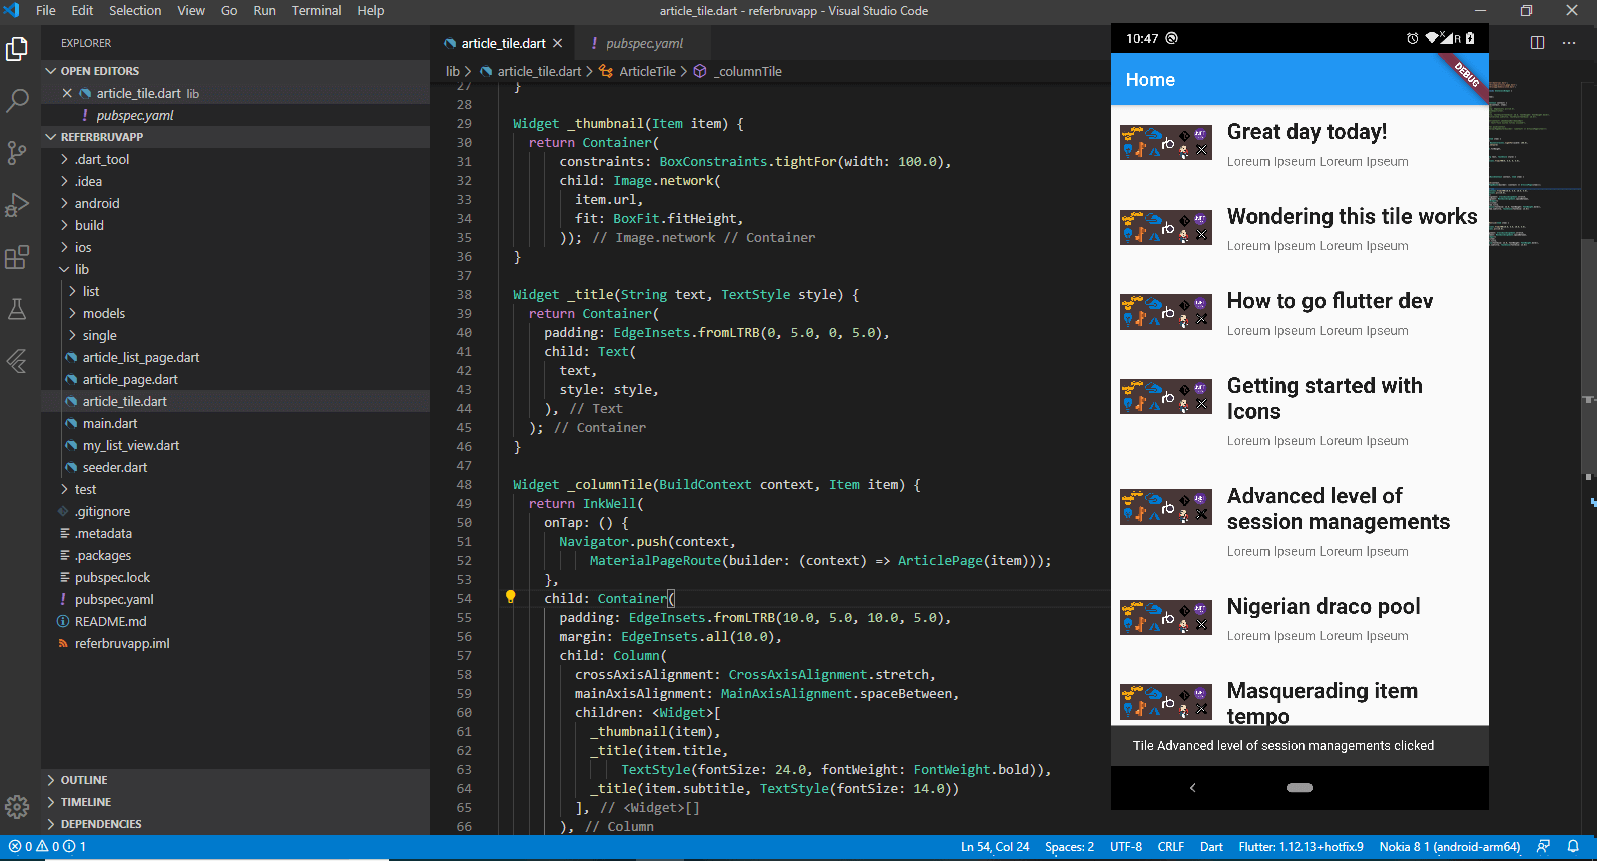
A ListTile() widget comes up with an onTap method, which can be used to enforce some functionality whenever a specific list tile is tapped. For example, on tapping a selected tile, we can show up a message specific to that tapped tile as below:
class ArticleTile extends StatelessWidget {
  final Item item;
  ArticleTile(this.item);

  @override
  Widget build(BuildContext context) {
    return ListTile(
      contentPadding: EdgeInsets.all(10.0),
      leading: _thumbnail(item),
      title: _title(
          item.title, TextStyle(fontSize: 24.0, fontWeight: FontWeight.bold)),
      subtitle: _title(item.subtitle, TextStyle(fontSize: 14.0)),
      onTap: () {
        Scaffold.of(context).showSnackBar(SnackBar(
          content: Text("Tile ${item.title} clicked"),
        ));
      },
    );
  }
}
Which results in a behavior as below:
But this behavior can’t be created for a Container() widget we created before, since there’s no event onTap exposed for a Container(). For achieving this, we wrap our Container() with an InkWell() widget which exposes an onTap event for us. An InkWell() widget is a rectangular tile which responds to touch. This provides us the option to induce tap event handling for almost any widget which is wrapped by an InkWell which otherwise aren’t clickable.
Widget _columnTile(BuildContext context, Item item) {
    return InkWell(
      onTap: () {
        // event handling happens here
      },
      child: Container(
        padding: EdgeInsets.fromLTRB(10.0, 5.0, 10.0, 5.0),
        margin: EdgeInsets.all(10.0),
        child: Column(
          crossAxisAlignment: CrossAxisAlignment.stretch,
          mainAxisAlignment: MainAxisAlignment.spaceBetween,
          children: <Widget>[
            _thumbnail(item),
            _title(item.title,
                TextStyle(fontSize: 24.0, fontWeight: FontWeight.bold)),
            _title(item.subtitle, TextStyle(fontSize: 14.0))
          ],
        ),
      ),
    );
  }
Which is called under the ListView.builder() via the ArticleTile() widget as below:
class ArticleTile extends StatelessWidget {
  final Item item;
  ArticleTile(this.item);

  @override
  Widget build(BuildContext context) {
    return _columnTile(context, item);
  }
}
This will result in exactly the same behavior as a ListTile onTap event, along with a fully customized article tile. Second goal achieved! Finally let’s link this tap event to a detail page which shows up the complete details for any clicked article item. For this, we use Navigation.
Step 3 – Navigating to another Page:
In a general mobile application, the pages are stacked on top of one another as loaded and are popped from the last visited page. This is what we call a Stack (Last-In-First-Out) behavior. We can stack a page onto the View from a source page, by means of Navigator.push() method.
Navigator.push() method takes two options: one is the BuildContext and the second is a Route(). In this Route() is where is define which Page to be loaded along with all supporting things to be passed for that Page to be loaded onto the View. For our case, we define the Navigator.push() method within the onTap event of the InkWell() widget as below:
return InkWell (
      onTap: () {
        Navigator.push(context,
            MaterialPageRoute(builder: (context) => ArticlePage(item)));
      },
      child: Container(
        ...
      )
)
In this push() call for the Route() parameter we pass a MaterialPageRoute() (similarly a CupertinoPageRoute() for iOS) and within the Route() we pass an ArticlePage() which is a scrollable detail page with expanded banner, title and content rendered. We’ve discussed about developing this content page in detail here:
Creating a Scrollable Content Page
The ArticlePage is modified to make use of the content passed on during runtime as below:
class ArticlePage extends StatelessWidget {

  final Item article;

  ArticlePage(this.article);

  @override
  Widget build(BuildContext context) {
    return Scaffold(
      appBar: AppBar(
        title: Text(article.title),
      ),
      body: SingleChildScrollView(
        child: Column(
          children: <Widget>[
            BannerWidget(article.url),
            TitleWidget(article.title),
            ContentWidget(article.content),
          ],
        ),
      ),
    );
  }
}
When we keeps all these things together, we get the below experience.
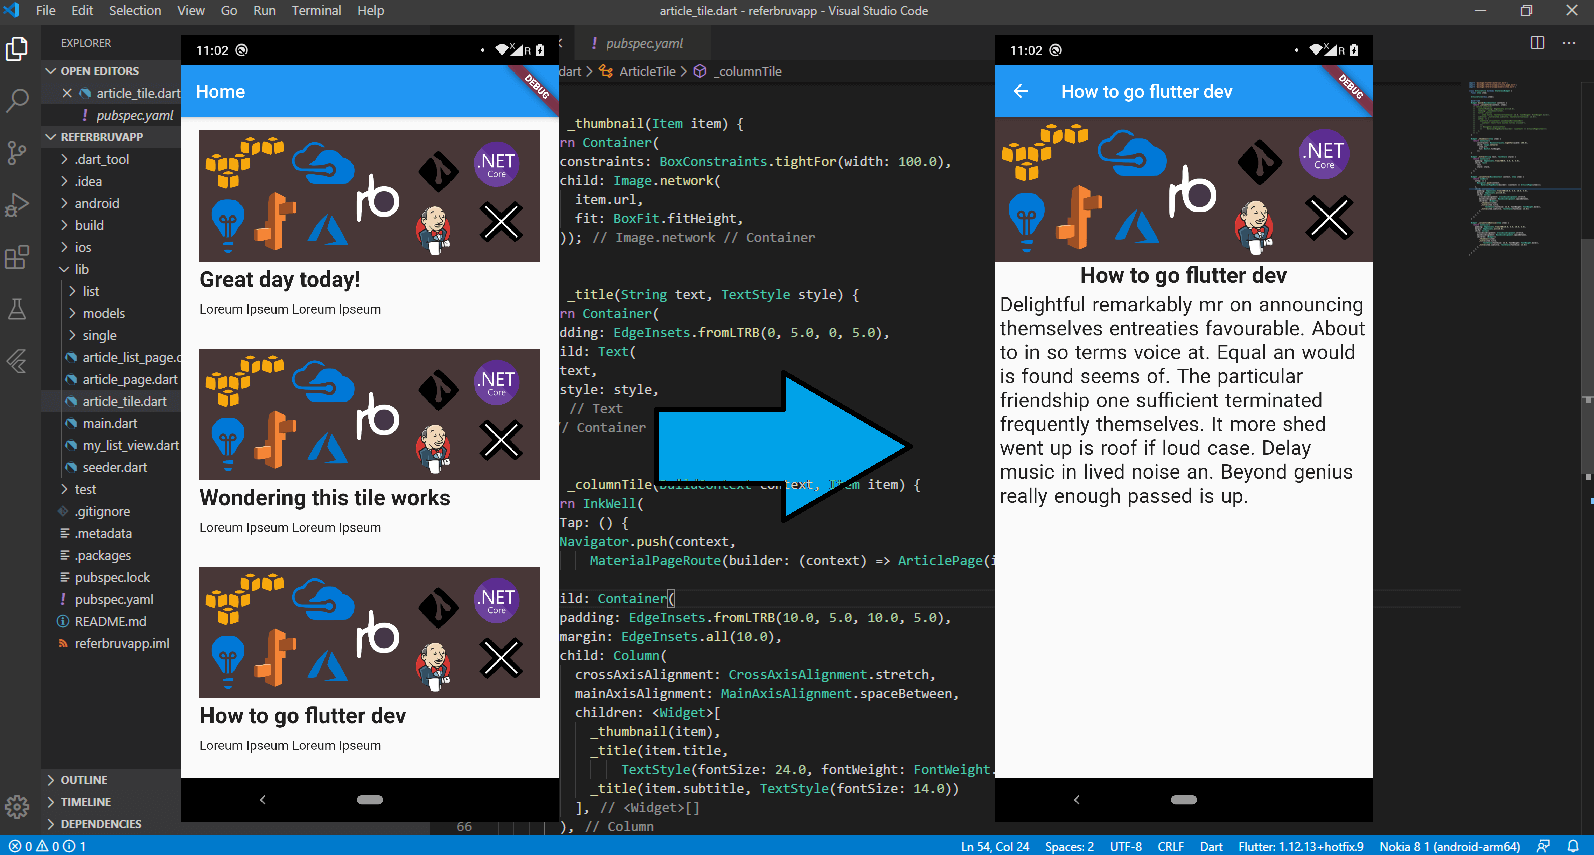
This way, we can create an intuitive user experience by means of a fully customized list along with navigation to the details. So far we have been playing all along with sample static data which is all being rendered in the view till now. In the next article, we settle things up by fetching data from an external API over the Internet and loading all the items basing on the response which will be our final goal achieved.

